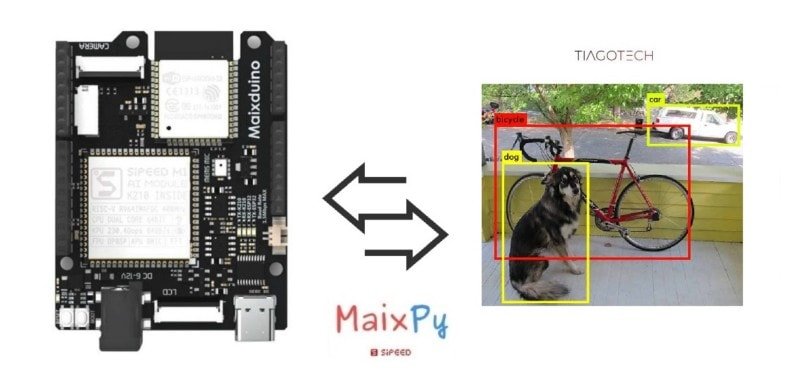
MaixPy #9: Maixduino Object Detection | AI MicroPython
Object detection is a computer technology related to computer vision and image processing that deals with detecting instances of semantic objects of a certain class (such as humans, buildings, or cars) in digital images and videos [2]. The object detection generic algorithm is:
- Identify and locate objects within an image or video
- Bounding boxes are then drawn around the detected objects
In this tutorial, I am going to deploy an AI model at the edge to detect classes of objects using the YOLO algorithm.
What Will We Need
![]()
- Maixduino development board: https://s.click.aliexpress.com/e/_DBd6fTF
- Objects
![]()
Maixduino Face Detection
Introduction to Yolo
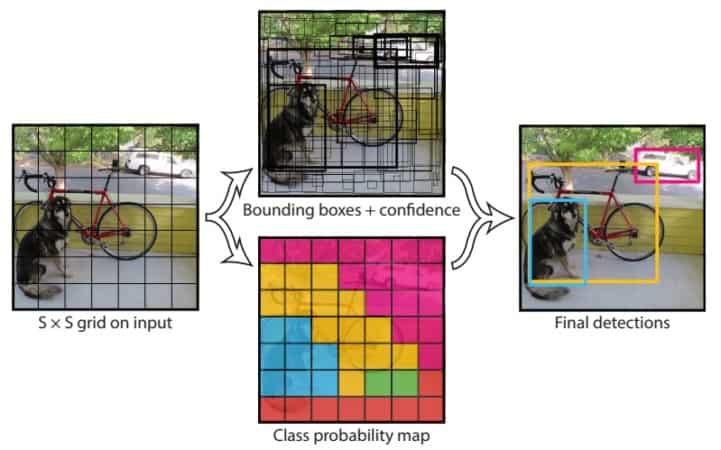
You only look once (YOLO) is a state-of-the-art, real-time object detection system. The team that developed the algorith apply a single neural network to the full image. This network divides the image into regions and predicts bounding boxes and probabilities for each region. These bounding boxes are weighted by the predicted probabilities. [3]
In this case, we just have to run the model at the edge because it is pre-trained and has been tested with hundreds of types of objects in every class. All of the CNN weights have been adjusted, and all that remains is for us to point the camera and wait for the model to draw a box with a certain level of confidence around the discovered object(s).
Aplications
We can use object detection for different tasks like:
- Vehicle counting
- Video object co-segmentation
- Tracking objects or people
Object detection vs Image Recognition
Image recognition and object detection are usually confused. It is important to clarify:
- Image recognition assigns a label to an image. If it is a dog or a million dogs, the result is the same. The label will be “Dog.”
- Object detection assigns a label to each object, “DOG”, and its location in the image is based on confidence levels. It provides more information.
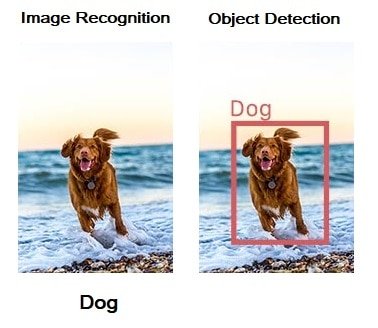
Source: https://www.fritz.ai/object-detection/
Maixduino YOLO V2 Face Detection Code
Import the modules:
import sensor
import image
import lcd
import KPU as kpu
import time
In order:
- Initialize the lcd with a specific frequency
- Initialize the camera
- Set the camera to default format (RGB565)
- The resolution is QVGA that is 320×240
- Set the camera horizontal/vertical mirroring
- Start to run, it is not necessary to call it in the current version, the camera will automatically start to run after the above settings are completed
lcd.init(freq=15000000)
sensor.reset()
sensor.set_pixformat(sensor.RGB565)
sensor.set_framesize(sensor.QVGA)
#sensor.set_vflip(1)
#sensor.run(1)
Get the current processor time as a floating point number expressed in seconds:
clock = time.clock()
Define the list of classes, in this case, the available objects that are possible to detect.
classes = ['aeroplane', 'bicycle', 'bird', 'boat', 'bottle', 'bus', 'car', 'cat', 'chair', 'cow', 'diningtable', 'dog', 'horse', 'motorbike', 'person', 'pottedplant', 'sheep', 'sofa', 'train', 'tvmonitor']
There are two ways to “put” the model in the Maixduino:
- Download it using the kflash tool to the 0x500000 address
- Put it in the SD Card
task = kpu.load(0x500000)
#task = kpu.load("/sd/20object.kmodel")
The anchor point parameters are consistent with the model parameters. This parameter of a model is fixed and bound to the model (it is determined when the model is trained) and cannot be changed to other values
anchor = (1.08, 1.19, 3.42, 4.41, 6.63, 11.38, 9.42, 5.11, 16.62, 10.52)
Because the model of YOLO V2 is used, it has a dedicated function interface. We have to use init_yolo2 to initialize the model.
a = kpu.init_yolo2(task, 0.5, 0.3, 5, anchor)
In the loop, The YOLO v2 model runs a deep learning CNN on an input image to produce network predictions. When the probability is higher than the predefined in the function (kpu.init_yolo2), The network marks the position of the recognized object, the name of the object, and the confidence level by drawing a rectangle.
while(True):
    clock.tick()
    img = sensor.snapshot()
    code = kpu.run_yolo2(task, img)
    print(clock.fps())
    if code:
        for i in code:
            a=img.draw_rectangle(i.rect())
            a = lcd.display(img)
            for i in code:
                lcd.draw_string(i.x(), i.y(), classes[i.classid()], lcd.RED, lcd.WHITE)
                lcd.draw_string(i.x(), i.y()+12, '%f1.3'%i.value(), lcd.RED, lcd.WHITE)
    else:
        a = lcd.display(img)
Release the memory occupied by the model
a = kpu.deinit(task)
Maixduino Object Detection (Extra Step)
If you have had problems like me trying to get this to work, we can use the method “when everything fails, erase the chip.” Well, that is what I did, because sometimes we have a lot of garbage on the board from tests and whatnot. To do this, we have to use the kflash tool in the erase mode to clean our Maixduino.
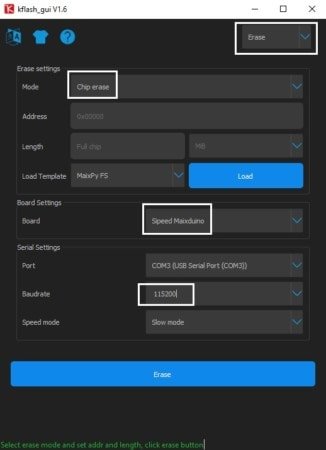

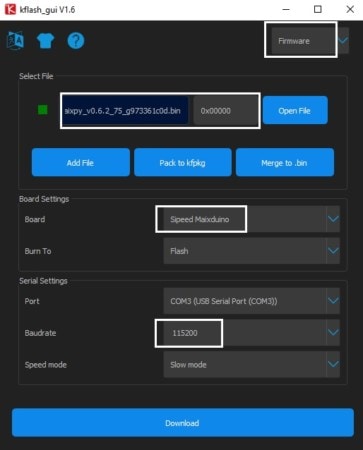
Another thing that i wanted to mention is that i am using the firmware maixpy_v0.6.2_75_g973361c0d.bin version. We need to download the firmware to the board again because we erased the chip. (File in the materials section or on the Sipeed website)

Maixduino Object Detection Model Files
I forgot to mention one thing that I discovered. There are some considerations that we have to make related to the extensions of the model files. As you know, the model files can be downloaded to a specific address on the Maixduino chip, or we can leave them on the SD card and access them that way. Another thing that is important to know are the file model extensions:
- *.KFPKG it is a compressed archive (you can use winrar,winzip, etc.) that contains two files; the model and an *.json file that contains the information that the KFlash tool has to know, like the model file and the memory address to download too. That is why we don’t need to be worried about writing down the memory address manually.
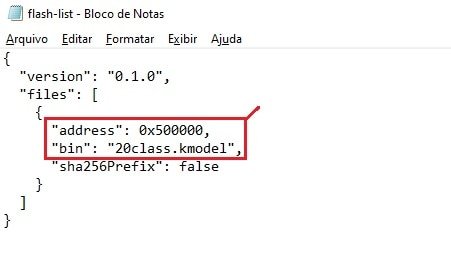
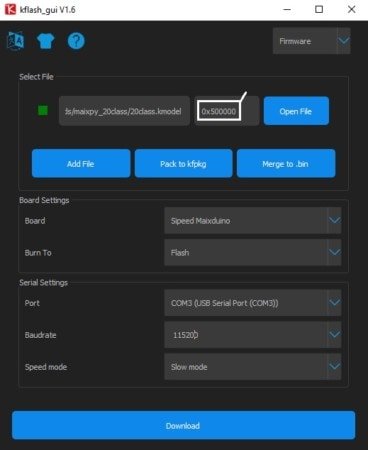
- *.kmodel it is the model file. In this case, because we don’t have the *.json file, we have to write in the KFlash tool the memory address manually.
Maixduino Object Detection Experiment Steps
- Download the Ai Model from the materials section.
- Flash the model to the Maixduino board with the kflash_gui tool to the 0x500000 address.
- I reduced the Baud Rate. It is a way for the download to be successful.
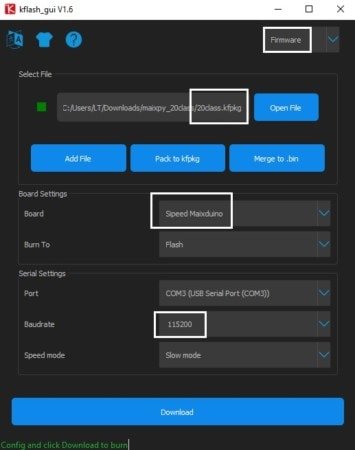

- And finally, if everything goes according to plan, we just have to open and run the 20_Object_Detection_Model.py file that can be found bellow in the materials section.
Final Code
import sensor,image,lcd,time
import KPU as kpu

lcd.init(freq=15000000)
sensor.reset()
sensor.set_pixformat(sensor.RGB565)
sensor.set_framesize(sensor.QVGA)
#sensor.set_vflip(1)
#sensor.run(1)

clock = time.clock()

classes = ['aeroplane', 'bicycle', 'bird', 'boat', 'bottle', 'bus', 'car', 'cat', 'chair', 'cow', 'diningtable', 'dog', 'horse', 'motorbike', 'person', 'pottedplant', 'sheep', 'sofa', 'train', 'tvmonitor']
task = kpu.load(0x500000)
anchor = (1.08, 1.19, 3.42, 4.41, 6.63, 11.38, 9.42, 5.11, 16.62, 10.52)
a = kpu.init_yolo2(task, 0.5, 0.3, 5, anchor)

while(True):
    clock.tick()
    img = sensor.snapshot()
    code = kpu.run_yolo2(task, img)
    print(clock.fps())
    if code:
        for i in code:
            a=img.draw_rectangle(i.rect())
            a = lcd.display(img)
            for i in code:
                lcd.draw_string(i.x(), i.y(), classes[i.classid()], lcd.RED, lcd.WHITE)
                lcd.draw_string(i.x(), i.y()+12, '%f1.3'%i.value(), lcd.RED, lcd.WHITE)
    else:
        a = lcd.display(img)
a = kpu.deinit(task)
Some tests:
Maixduino Experiment Materials
- Firmware: maixpy_v0.6.2_75_g973361c0d.bin
- AI Model: 20class_KFPKG_and_KMODEL
- Code: Maixduino Object Detection Code
References
[1] https://www.fritz.ai/object-detection/
[2] https://en.wikipedia.org/wiki/Object_detection
[3] https://pjreddie.com/darknet/yolov2/