MaixPy #7: Maixduino OLED Display | I2C MicroPython
The I2C protocol describes the operation of a serial communication bus that uses just two wires. Invented by Philips in the early 90’s, this protocol is widely used to connect low-speed peripherals to motherboards, microcontrollers, and related devices.

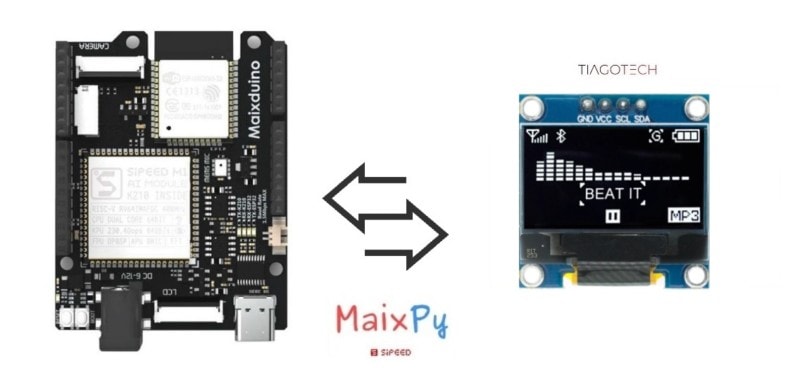
In this tutorial, I am going to establish the I2C communication between the Maixduino and the 0.95inch 128X64 OLED Display.
What Will We Need
![]()
- Maixduino development board: https://s.click.aliexpress.com/e/_DBd6fTF
- Display OLED i2c 0.95inch 128X64: https://s.click.aliexpress.com/e/_Ddu8WwH
- Breadboard and some jumper wires
![]()
Maixduino I2C Comunication (Simplified)
Introduction
There are other wires on the I2C Bus that constitute the circuit, but the most important ones are:
- SCL: The clock line is responsible for the clock on the bus.
- SDA: The data line is responsible for the transmission of the data.
These wires are connected to all the devices on the bus. In the circuit, there are also two pull-up resistors.
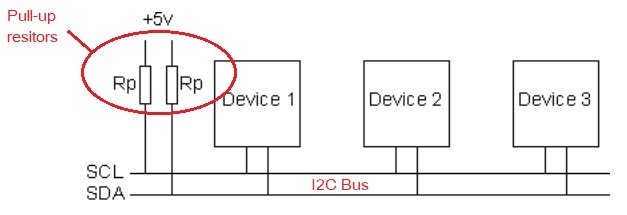
The resistors need to be in the circuit because the transistors are open-drain, which means that when they are activated, they are pulled to the ground (0 volts). The pull-up resistor ensures that the lines remain at the VCC voltage, which is normally 3.3-5 Volt.
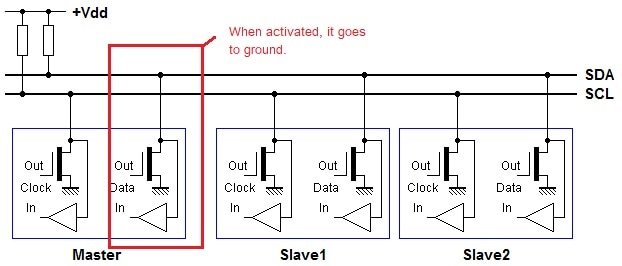
I2C Master / Slave
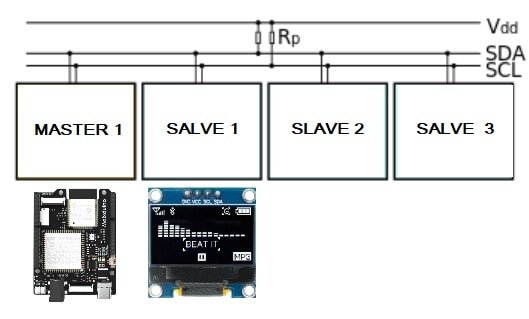
On the bus, the devices can be either masters or slaves, but the first one (the master) is the one that gives the orders that are given via the SCL clock line. In our case, the Master will be the Maixduino Board, and the Slave, the OLED Display. Ignore the typo error (where is the SALVE 1?)…
Basic I2C Algorithm
This is a very basic I2C algorithm. There is much more to explore, like the R/W and ACK bits functions. We can write and read from a slave, but the last procedure is a bit more complex (not much). In this case, we only want to send commands to the display, so there is no need to complicate things. To write to a slave device, the algorithm is as follows:
1. Begin by sending a start sequence.This is a unique sequence in which the SDA line is allowed to change to low while the SCL is high.
2. Send the I2C address of the slave with the R/W bit low (even address). Every slave has an address that can be used for communication.
3. Send the internal register number to which you wish to write. Especify were in the memory of the slave (OLED display), we what to write.
4. Send the data byte. Send the info that we want to: display on/off, show text, etc.
5. [Optional: send any additional data bytes]
6. Execute the stop sequence.(Special sequence)

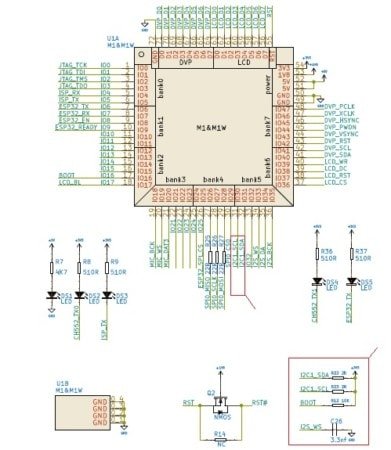
The AI module of the Maixduino board has the ability to implement I2C communication. There are 2 pins available for I2C operations on the board. We can see them highlighted in the schematic below.
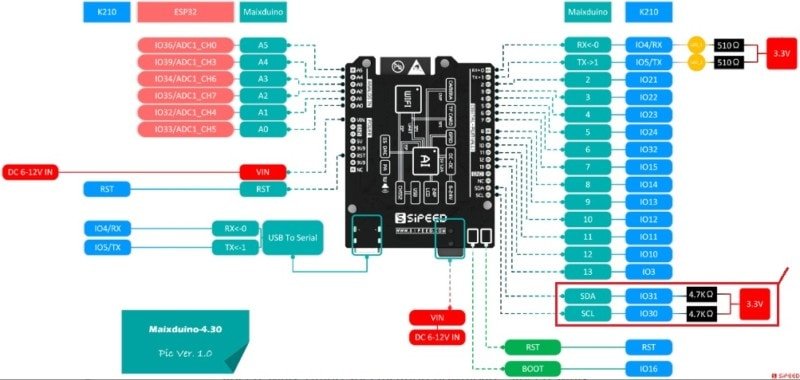
Here’s a link to the bigger schematic here (Sipped official site).
Maixduino I2C Pins
The pins used for I2C communication by the Ai Module of the Maixduino board are as follows:
- IO30 I2C1_SCL (AI Module) <–>SCL PIN of the Maixduino Board
- IO31 I2C1_SCA (AI Module) <–>SCA PIN of the Maixduino Board
Maixduino original schematic link (Github)
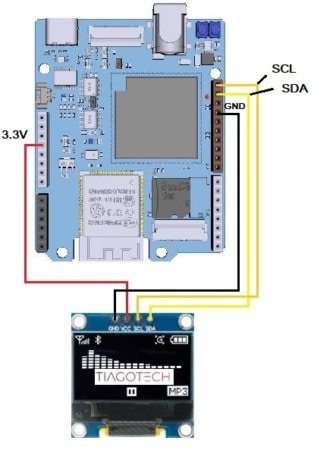
Circuit
Maixduino OLED Display Code (Original)
Introduction
The guys at Sipeed are really lazy. They give us a really really simple code to work with. Well, let’s see. They give us a way to switch the display on/off and fill the screen. Very useful. Ah, and don’t forget to change the pins in the code for the I2C (scl=30, sda=31) to use with the Maixduino board. Man…
import time
from machine import I2C

SSD1306_CMD  = 0
SSD1306_DATA = 1
SSD1306_ADDR = 0x3c

def oled_init(i2c):
    i2c.writeto_mem(SSD1306_ADDR, 0x00, 0xAE, mem_size=8)
    i2c.writeto_mem(SSD1306_ADDR, 0x00, 0x20, mem_size=8)
    i2c.writeto_mem(SSD1306_ADDR, 0x00, 0x10, mem_size=8)
    i2c.writeto_mem(SSD1306_ADDR, 0x00, 0xb0, mem_size=8)
    i2c.writeto_mem(SSD1306_ADDR, 0x00, 0xc8, mem_size=8)
    i2c.writeto_mem(SSD1306_ADDR, 0x00, 0x00, mem_size=8)
    i2c.writeto_mem(SSD1306_ADDR, 0x00, 0x10, mem_size=8)
    i2c.writeto_mem(SSD1306_ADDR, 0x00, 0x40, mem_size=8)
    i2c.writeto_mem(SSD1306_ADDR, 0x00, 0x81, mem_size=8)
    i2c.writeto_mem(SSD1306_ADDR, 0x00, 0xff, mem_size=8)
    i2c.writeto_mem(SSD1306_ADDR, 0x00, 0xa1, mem_size=8)
    i2c.writeto_mem(SSD1306_ADDR, 0x00, 0xa6, mem_size=8)
    i2c.writeto_mem(SSD1306_ADDR, 0x00, 0xa8, mem_size=8)
    i2c.writeto_mem(SSD1306_ADDR, 0x00, 0x3F, mem_size=8)
    i2c.writeto_mem(SSD1306_ADDR, 0x00, 0xa4, mem_size=8)
    i2c.writeto_mem(SSD1306_ADDR, 0x00, 0xd3, mem_size=8)
    i2c.writeto_mem(SSD1306_ADDR, 0x00, 0x00, mem_size=8)
    i2c.writeto_mem(SSD1306_ADDR, 0x00, 0xd5, mem_size=8)
    i2c.writeto_mem(SSD1306_ADDR, 0x00, 0xf0, mem_size=8)
    i2c.writeto_mem(SSD1306_ADDR, 0x00, 0xd9, mem_size=8)
    i2c.writeto_mem(SSD1306_ADDR, 0x00, 0x22, mem_size=8)
    i2c.writeto_mem(SSD1306_ADDR, 0x00, 0xda, mem_size=8)
    i2c.writeto_mem(SSD1306_ADDR, 0x00, 0x12, mem_size=8)
    i2c.writeto_mem(SSD1306_ADDR, 0x00, 0xdb, mem_size=8)
    i2c.writeto_mem(SSD1306_ADDR, 0x00, 0x20, mem_size=8)
    i2c.writeto_mem(SSD1306_ADDR, 0x00, 0x8d, mem_size=8)
    i2c.writeto_mem(SSD1306_ADDR, 0x00, 0x14, mem_size=8)
    i2c.writeto_mem(SSD1306_ADDR, 0x00, 0xaf, mem_size=8)

def oled_on(i2c):
    i2c.writeto_mem(SSD1306_ADDR, 0x00, 0X8D, mem_size=8)
    i2c.writeto_mem(SSD1306_ADDR, 0x00, 0X14, mem_size=8)
    i2c.writeto_mem(SSD1306_ADDR, 0x00, 0XAF, mem_size=8)

def oled_off(i2c):
    i2c.writeto_mem(SSD1306_ADDR, 0x00, 0X8D, mem_size=8)
    i2c.writeto_mem(SSD1306_ADDR, 0x00, 0X10, mem_size=8)
    i2c.writeto_mem(SSD1306_ADDR, 0x00, 0XAE, mem_size=8)

def oled_fill(i2c, data):
    for i in range(0,8):
        i2c.writeto_mem(SSD1306_ADDR, 0x00, 0xb0+i, mem_size=8)
        i2c.writeto_mem(SSD1306_ADDR, 0x00, 0x10, mem_size=8)
        i2c.writeto_mem(SSD1306_ADDR, 0x00, 0x01, mem_size=8)
        for j in range(0,128):
            i2c.writeto_mem(SSD1306_ADDR, 0x40, data, mem_size=8)

i2c = I2C(I2C.I2C0, mode=I2C.MODE_MASTER, freq=400000, scl=28, sda=29, addr_size=7)

time.sleep(1)
oled_init(i2c)
oled_fill(i2c, 0xff)
Original code here (Original Sipped Wiki)
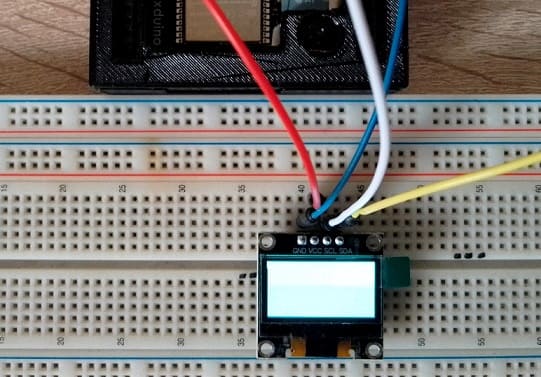
Effect
Maixduino OLED Display Code (V2)
Introduction
Making a workable version involves more work, much more. As i was surfing the “net” trying to find a way to make the display work, I stumbled upon a work made by an Asian fella (i think). The credits go entirely to him. I am just going to explain the steps (there are many).
Link to the original work: https://blog.csdn.net/qq_39784672/article/details/119274286
He found a way to use the official MicroPython SSD1306 library to drive the OLED display with some changes.
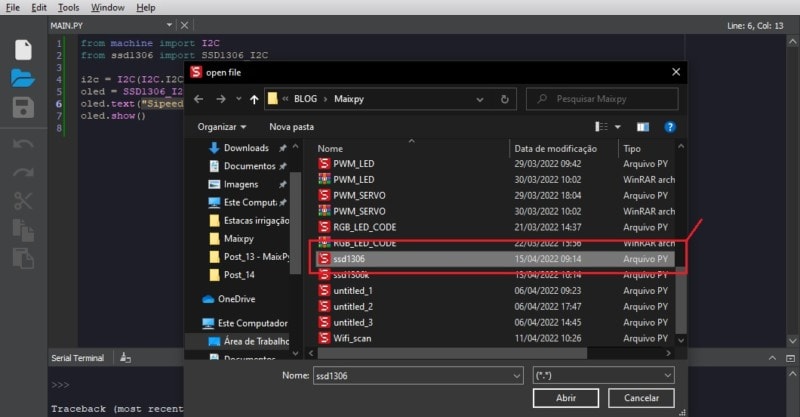
So, we will need:
- ssd1306 driver.py library –> to transfer the board
- framebuf.py module –> to transfer the board
- font.py module –> to transfer the board
- main_main.py file –> to control the display in the MaixPy IDE
Steps
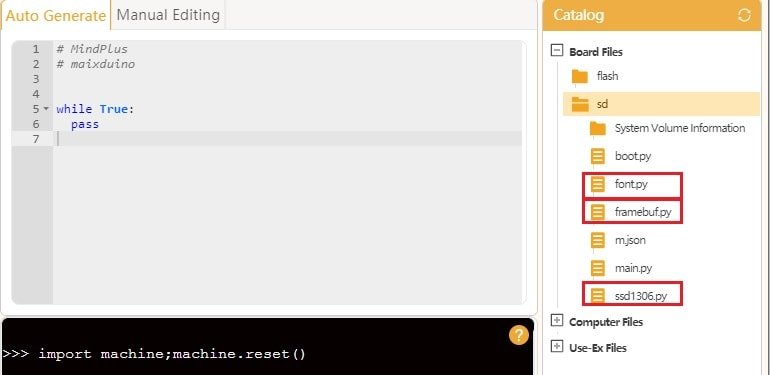
- Transfer the 3 files to the board (ssd1306 / framebuf / font)
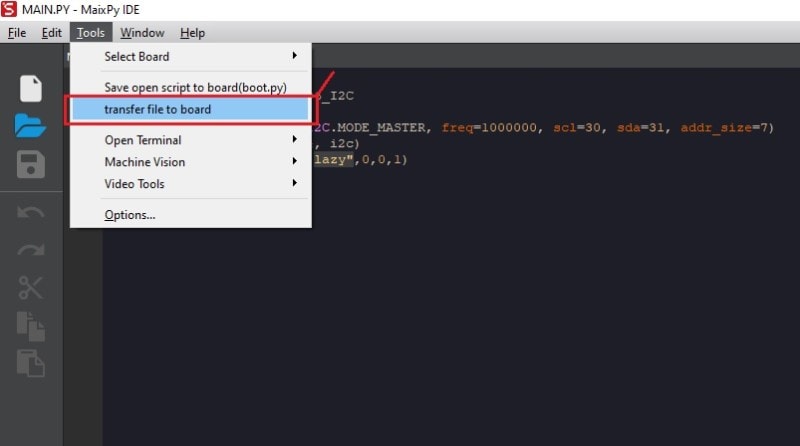
- Now the files will be available in the board. (I use another software as a file manager for the Maixduino)
- Run the main_main.py code in the MaixPy IDE (Don´t forget to double check the I2C Pins)
Problems?
- At the end of the procedure, I wasn’t able to run the code. I disconnected the board from the computer and tried again. This way, for me, it worked.
Final Code
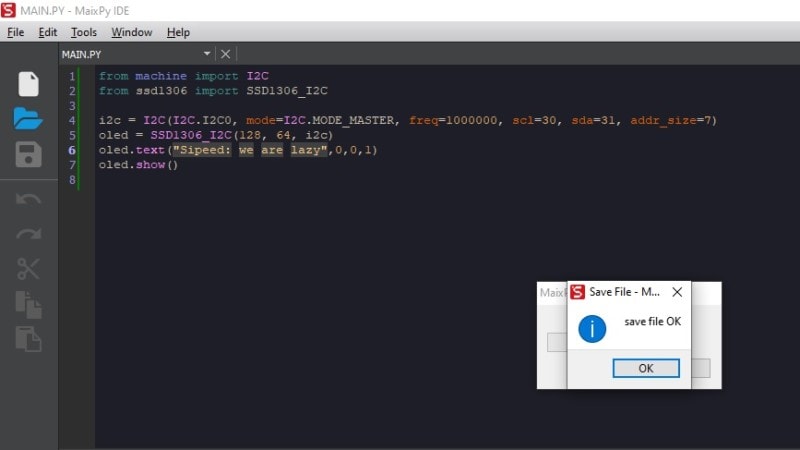
Now we are able to show something on the display (Draw some text at x=0 , y=0, color=1):
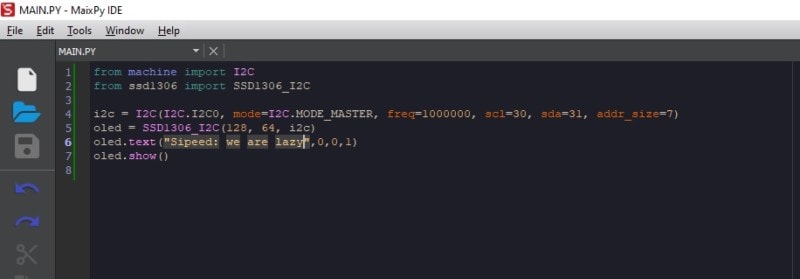
from machine import I2C
from ssd1306 import SSD1306_I2C

i2c = I2C(I2C.I2C0, mode=I2C.MODE_MASTER, freq=1000000, scl=30, sda=31, addr_size=7)
oled = SSD1306_I2C(128, 64, i2c)
oled.text("Sipeed: we are lazy",0,0,1)
oled.show()
Extra
Now the we can successfuly interact with the display (i hope), with this new tools we can make cool animations with the OLED display. I sugest you go to the MicroPython webpage to see the avalable functions. I made some changes to the code to show some pixel art, its cool.
Created three functions to help show the content in the main loop:
def Sipeed():
    oled.text("Sipeed: we are lazy",0,28,1)
    oled.show()

#Show just a T
def just_a_T():
    oled.fill(0)
    for y, row in enumerate(TiagoTech):
        for x, c in enumerate(row):
            oled.pixel(x, y, c)
    oled.show()

#Random T´s
def T():
    xofs = urandom.getrandbits(11)
    yofs = urandom.getrandbits(5)
    for y, row in enumerate(TiagoTech):
        for x, c in enumerate(row):
            oled.pixel(x + xofs, y + yofs, c)
Created a loop to show the content of the functions on the display:
while(1):
    Sipeed()
    oled.fill(0)          #Clear the display
    utime.sleep_ms(2000)  #Wait 2 seconds
    just_a_T()
    oled.fill(0)
    utime.sleep_ms(2000)
    for n in range(100):  #Show random T´s
        T()
    oled.show()
    oled.fill(0)
    utime.sleep_ms(2000)
Final code
from machine import I2C
from ssd1306 import SSD1306_I2C
import urandom, utime

TiagoTech = [
    [ 1, 1, 1, 1, 1, 1, 1, 1, 1],
    [ 1, 1, 1, 1, 1, 1, 1, 1, 1],
    [ 1, 1, 1, 1, 1, 1, 1, 1, 1],
    [ 1, 1, 1, 1, 1, 1, 1, 1, 1],
    [ 1, 1, 1, 1, 1, 1, 1, 1, 1],
    [ 0, 0, 0, 1, 1, 1, 0, 0, 0],
    [ 0, 0, 0, 1, 1, 1, 0, 0, 0],
    [ 0, 0, 0, 1, 1, 1, 0, 0, 0],
    [ 0, 0, 0, 1, 1, 1, 0, 0, 0],
    [ 0, 0, 0, 1, 1, 1, 0, 0, 0],
    [ 0, 0, 0, 1, 1, 1, 0, 0, 0],
    [ 0, 0, 0, 1, 1, 1, 0, 0, 0],
    [ 0, 0, 0, 1, 1, 1, 0, 0, 0],
    [ 0, 0, 0, 1, 1, 1, 0, 0, 0],
    [ 0, 0, 0, 1, 1, 1, 0, 0, 0],
    [ 0, 0, 0, 1, 1, 1, 0, 0, 0],
]
i2c = I2C(I2C.I2C0, mode=I2C.MODE_MASTER, freq=1000000, scl=30, sda=31, addr_size=7)

oled = SSD1306_I2C(128, 64, i2c)


def Sipeed():
    oled.text("Sipeed: we are lazy",0,28,1)
    oled.show()


#Show just a T
def just_a_T():
    oled.fill(0)
    for y, row in enumerate(TiagoTech):
        for x, c in enumerate(row):
            oled.pixel(x, y, c)
    oled.show()

#Random T´s
def T():
    xofs = urandom.getrandbits(11)
    yofs = urandom.getrandbits(5)
    for y, row in enumerate(TiagoTech):
        for x, c in enumerate(row):
            oled.pixel(x + xofs, y + yofs, c)

while(1):
    Sipeed()
    oled.fill(0)          #Clear the display
    utime.sleep_ms(2000)  #Wait 2 seconds
    just_a_T()
    oled.fill(0)
    utime.sleep_ms(2000)
    for n in range(100):  #Show random T´s
        T()
    oled.show()
    oled.fill(0)
    utime.sleep_ms(2000)
Maixduino Experiment Materials
References
[2] https://paginas.fe.up.pt/~hsm/docencia/comp/spi-e-i2c/
[3] https://wiki.sipeed.com/soft/maixpy/en/
[4] https://www.robot-electronics.co.uk/i2c-tutorial
[5] https://blog.csdn.net/qq_39784672/article/details/119274286
[6] https://en.wikipedia.org/wiki/I%C2%B2C
[8] https://blog.csdn.net/qq_39784672/article/details/119274286