WeMos D1 Mini + Rotary Encoder + 2004 LCD with a Menu
In this comprehensive guide, we will learn how to connect a WeMos D1 Mini to a rotary encoder and a 2004 LCD display to create a menu system. The WeMos D1 Mini is a compact ESP8266-based development board that is perfect for IoT projects. The rotary encoder will be used for navigating through the menu, and the 2004 LCD will display the menu options. We be also controlling a LED via this menu system. This tutorial will cover the hardware connections, required libraries, and a detailed explanation of the code.
Requirements:
- ESP8266 development board (e.g., NodeMCU or Wemos D1 Mini) (Affiliate) – https://s.click.aliexpress.com/e/_DD3JQhj
- Rotary Encoder (Affiliate) – https://s.click.aliexpress.com/e/_Dl7iO57
- 2004 LCD module (with I2C interface) – (Affiliate) – https://s.click.aliexpress.com/e/_DE4GaZb
- LED + 220 Ohm resistor
- Breadboard and jumper wires (Affiliate) – https://s.click.aliexpress.com/e/_Dl5kuk1
Step 1: Connecting the Rotary Encoder
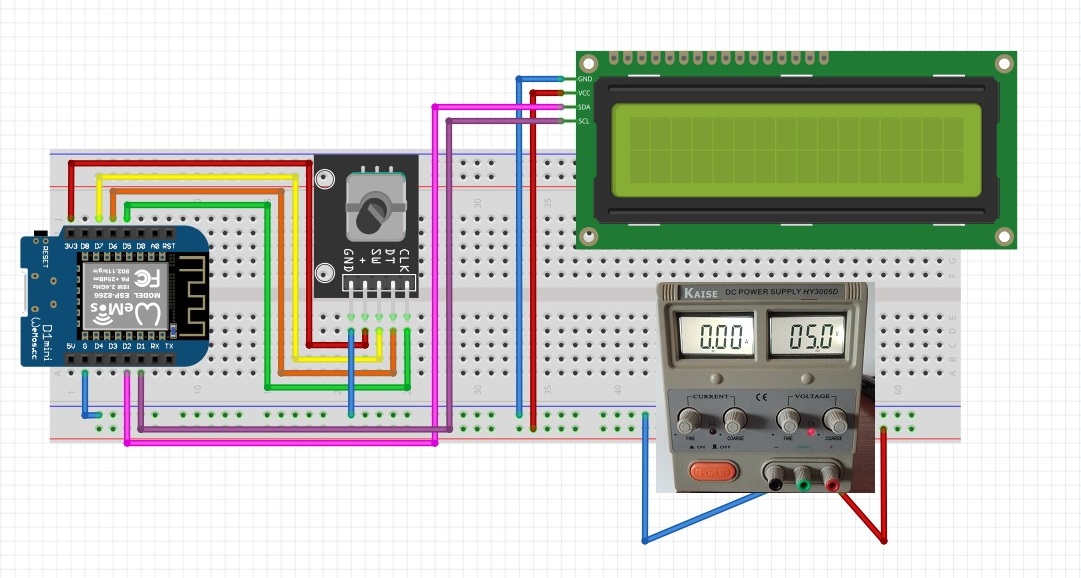
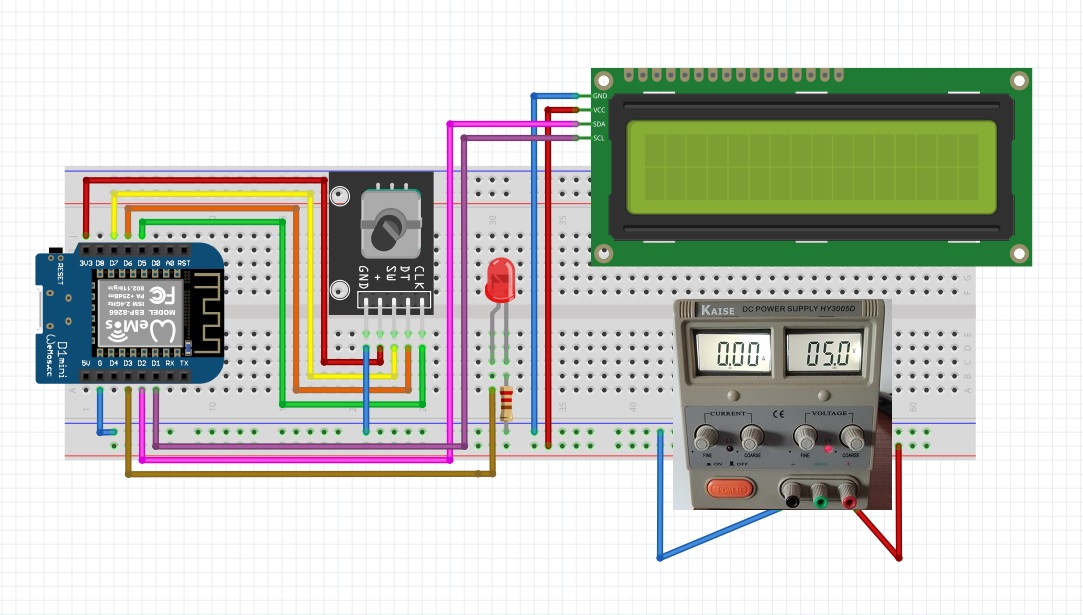
First, let’s connect the rotary encoder to the WeMos D1 Mini. The rotary encoder has five pins: CLK, DT, SW, +, and GND. Connect them as follows:
- CLK to D5 : This pin is responsible for detecting the rotation direction.
- DT to D6 : This pin is responsible for detecting the rotation steps.
- SW to D7 : This pin is responsible for detecting button presses.
- VCC to 3.3V: This pin provides power to the rotary encoder.
- GND to GND: This pin connects the rotary encoder to the ground.
Step 2: Connecting the 2004 LCD Display (External regulated power source)
Next, connect the 2004 LCD display to the WeMos D1 Mini. The display has four pins: GND, VCC, SDA, and SCL. Connect them as follows:
- GND to GND : This pin connects the LCD display to the ground.
- VCC to 5V : This pin provides power to the LCD display.
- SDA to D2 : This pin is responsible for data transmission between the WeMos D1 Mini and the LCD display.
- SCL to D1 : This pin is responsible for the clock signal between the WeMos D1 Mini and the LCD display.
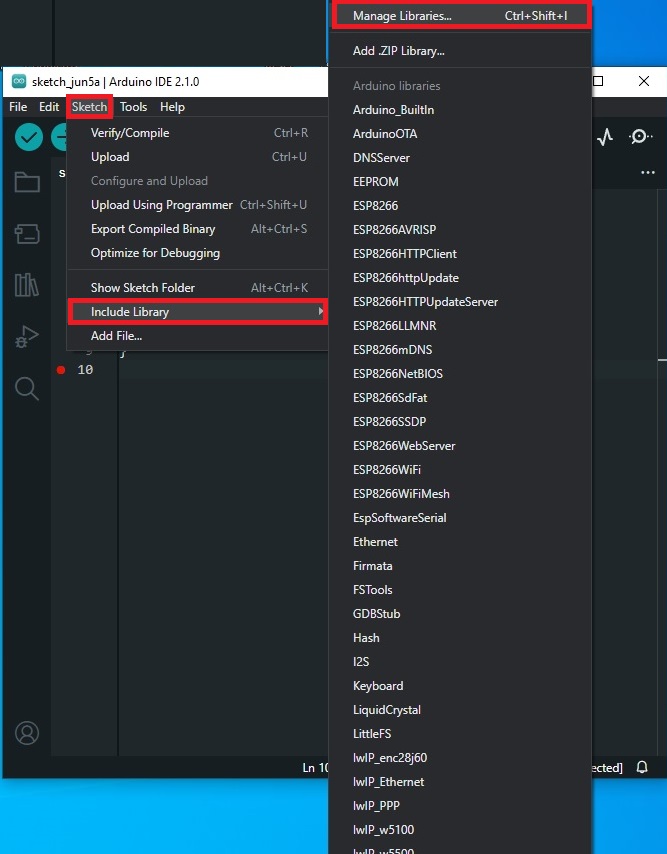
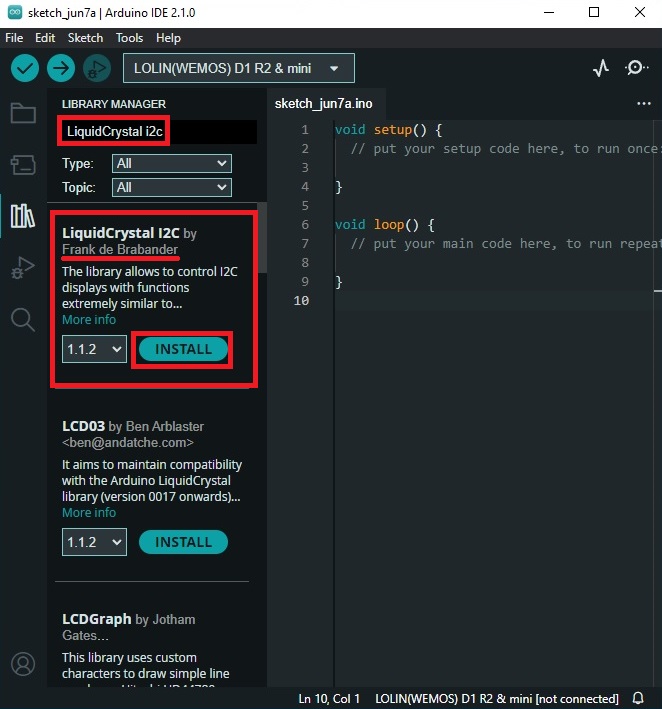
Step 3: Installing the Required Libraries
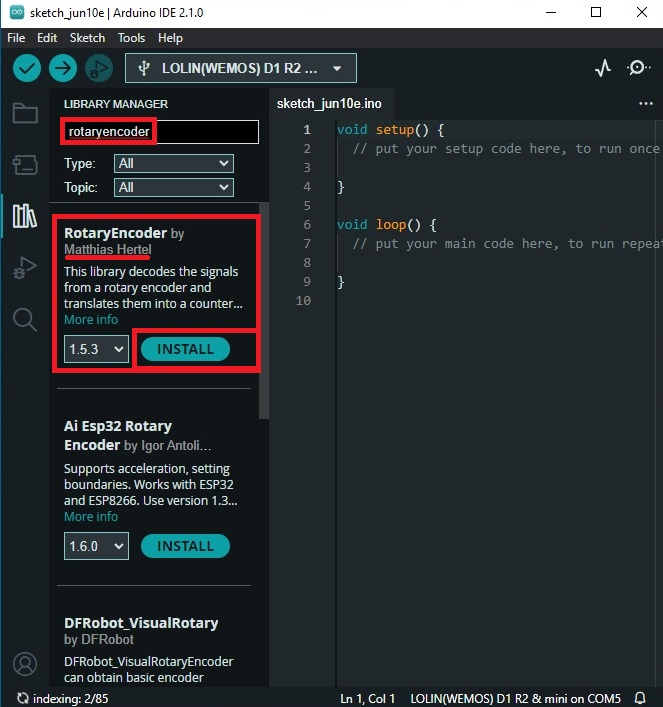
Before we start coding, we need to install the required libraries for the rotary encoder and the 2004 LCD display. You can find the libraries in the Arduino IDE Library Manager:
- RotaryEncoder by Matthias Hertel: This library provides an easy way to read the rotary encoder’s position and direction.
- LiquidCrystal_I2C by Frank de Brabander: This library allows you to control the 2004 LCD display using the I2C protocol.
Step 4: Coding the Menu System
Now that we have connected the hardware and installed the required libraries, let’s write the code for the menu system. Open the Arduino IDE and create a new sketch. Copy and paste the following code:
#include <Wire.h>
#include <LiquidCrystal_I2C.h>
#include <RotaryEncoder.h>

// Initialize the LCD display
LiquidCrystal_I2C lcd(0x27, 20, 4);

// Initialize the rotary encoder
RotaryEncoder encoder(D5, D6);

// Define the menu items
const char* menuItems[] = {"Option 1", "Option 2", "Option 3", "Option 4"};

// Variables to store the current menu position and previous position
int menuPosition = 0;
int prevMenuPosition = 0;

void setup() {
  // Initialize the LCD display
  lcd.init();
  lcd.backlight();

  // Initialize the rotary encoder
  pinMode(D7, INPUT_PULLUP);
  encoder.setPosition(0);

  // Display the menu
  displayMenu();
}

void loop() {
  // Read the rotary encoder
  encoder.tick();

  // Update the menu position
  menuPosition = encoder.getPosition() % 4;
  if (menuPosition < 0) {
    menuPosition += 4;
  }

  // Check if the menu position has changed
  if (menuPosition != prevMenuPosition) {
    displayMenu();
    prevMenuPosition = menuPosition;
  }

  // Check if the rotary encoder button is pressed
  if (digitalRead(D7) == LOW) {
    // Perform an action based on the selected menu item
    switch (menuPosition) {
      case 0:
        // Action for Option 1
        break;
      case 1:
        // Action for Option 2
        break;
      case 2:
        // Action for Option 3
        break;
      case 3:
        // Action for Option 4
        break;
    }
  }
}

void displayMenu() {
  lcd.clear();
  for (int i = 0; i < 4; i++) {
    if (i == menuPosition) {
      lcd.print("> ");
    } else {
      lcd.print("  ");
    }
    lcd.print(menuItems[i]);
    lcd.setCursor(0, i + 1);
  }
}
- In this code, we first include the necessary libraries and initialize the LCD display and rotary encoder. We define an array of menu items and two variables to store the current and previous menu positions.
- In the setup() function, we initialize the LCD display, rotary encoder, and display the menu. In the loop() function, we read the rotary encoder’s position and update the menu position accordingly. We also check if the menu position has changed and update the display if necessary. Finally, we check if the rotary encoder button is pressed and perform an action based on the selected menu item.
- The displayMenu() function is responsible for displaying the menu on the LCD screen. It clears the screen, iterates through the menu items, and prints them with a “>” symbol indicating the current selection.
Step 5: Uploading the Code
Connect the WeMos D1 Mini to your computer using a micro USB cable. In the Arduino IDE, select the correct board (WeMos D1 R2 & Mini) and the correct COM port. Click the Upload button to upload the code to the WeMos D1 Mini.
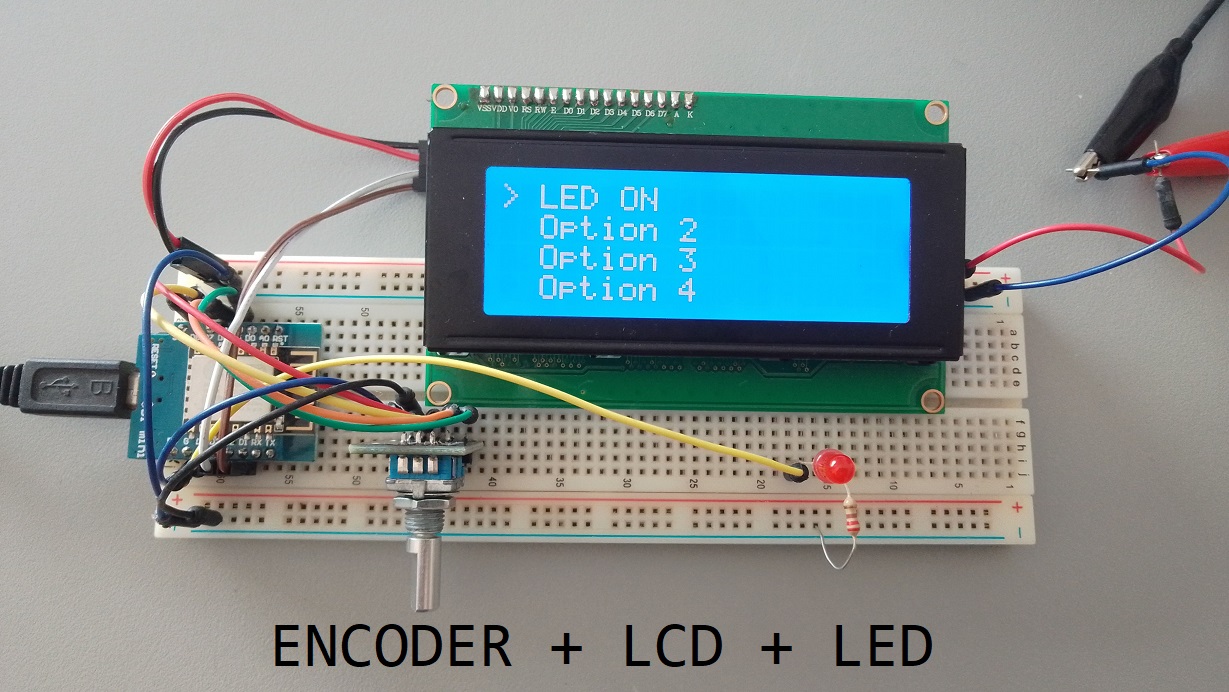
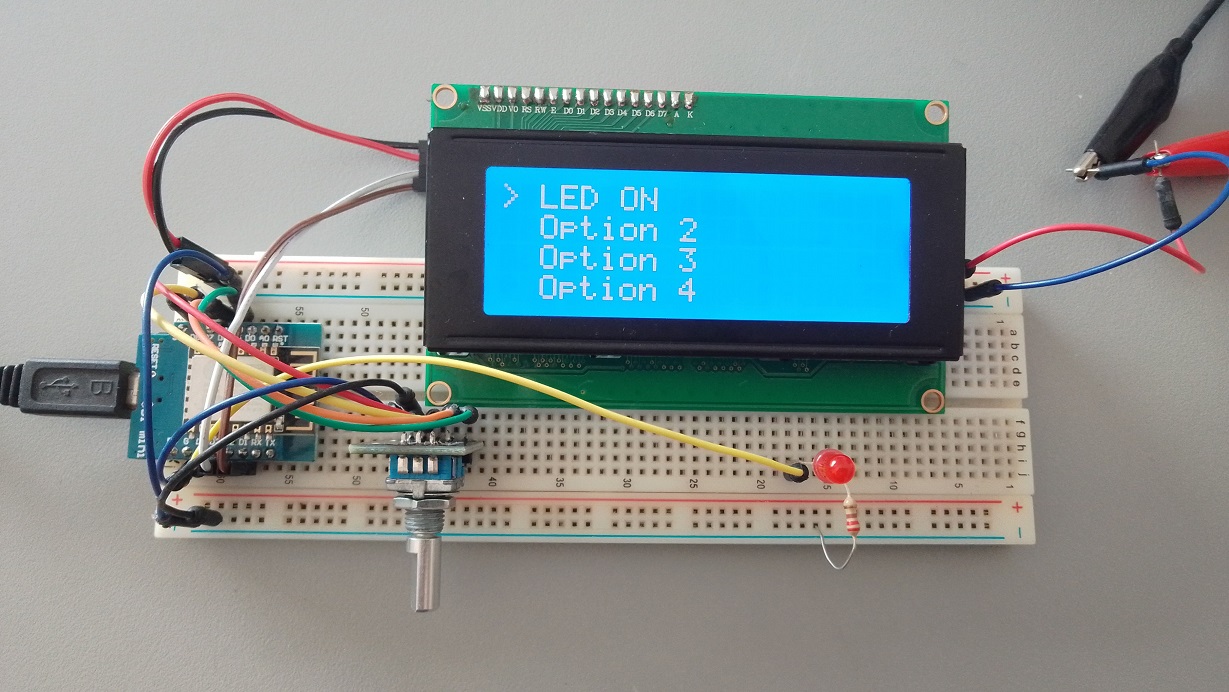
Expanding the code: Adding some LED action
Very simple addon Code where a LED is connected to the D3 Pin and turn On when we select the option in the menu.
#include <Wire.h>
#include <LiquidCrystal_I2C.h>
#include <RotaryEncoder.h>

// Initialize the LCD display
LiquidCrystal_I2C lcd(0x27, 20, 4);

// Initialize the rotary encoder
RotaryEncoder encoder(D5, D6);
const int ledPin = D3;

// Define the menu items
const char* menuItems[] = { "LED ON", "Option 2", "Option 3", "Option 4" };

// Variables to store the current menu position and previous position
int menuPosition = 0;
int prevMenuPosition = 0;

void setup() {
  // Initialize the LCD display
  lcd.init();
  lcd.backlight();

  // Initialize the rotary encoder
  pinMode(D7, INPUT_PULLUP);
  pinMode(ledPin, OUTPUT);
  digitalWrite(ledPin, LOW);

  encoder.setPosition(0);

  // Display the menu
  displayMenu();
}

void loop() {
  // Read the rotary encoder
  encoder.tick();

  // Update the menu position
  menuPosition = encoder.getPosition() % 4;
  if (menuPosition < 0) {
    menuPosition += 4;
  }
 digitalWrite(ledPin, LOW);
  // Check if the menu position has changed
  if (menuPosition != prevMenuPosition) {
    displayMenu();
    prevMenuPosition = menuPosition;
  }

  // Check if the rotary encoder button is pressed
  if (digitalRead(D7) == LOW) {
    // Perform an action based on the selected menu item
    switch (menuPosition) {
      case 0:
        digitalWrite(ledPin, HIGH);
        break;
      case 1:
        // Action for Option 2
        break;
      case 2:
        // Action for Option 3
        break;
      case 3:
        // Action for Option 4
        break;
    }
  }
}

void displayMenu() {
  lcd.clear();
  for (int i = 0; i < 4; i++) {
    if (i == menuPosition) {
      lcd.print("> ");
    } else {
      lcd.print("  ");
    }
    lcd.print(menuItems[i]);
    lcd.setCursor(0, i + 1);
  }
}
Problems?
In this section, we will discuss some common issues that you may encounter while the multi-level menu system with the WeMos D1 Mini, rotary encoder, 2004 LCD display, and DHT11 sensor, and provide solutions to resolve them.
-
The LCD display is not showing any text or showing garbled text.Solution: Check the I2C address of your LCD display. The default address in the code is 0x27, but it may be different for your specific display. You can use an I2C scanner sketch to find the correct address and update the code accordingly.
-
The rotary encoder is not responding or behaving erratically.Solution: Ensure that the rotary encoder is properly connected to the WeMos D1 Mini. Check the connections for the CLK, DT, and SW pins. Also, make sure that the rotary encoder library is correctly installed in the Arduino IDE.
-
The code is not uploading to the WeMos D1 Mini.Solution: Check the board selection and COM port in the Arduino IDE. Ensure that the correct board (WeMos D1 R2 & Mini) and COM port are selected. Also, make sure that the WeMos D1 Mini is connected to your computer using a micro USB cable.
If you still encounter issues after trying these troubleshooting steps, double-check all connections and review the code to ensure that everything is set up correctly. If necessary, consult the documentation for the WeMos D1 Mini, rotary encoder, 2004 LCD display, and DHT11 sensor for additional information and guidance.
Conclusion:
You have now successfully connected a WeMos D1 Mini to a rotary encoder and a 2004 LCD display to create a menu system. You can customize the menu items and actions in the code to suit your specific project requirements. This setup can be used in various applications, such as home automation systems, IoT devices, or any project that requires user interaction through a menu. Happy coding!