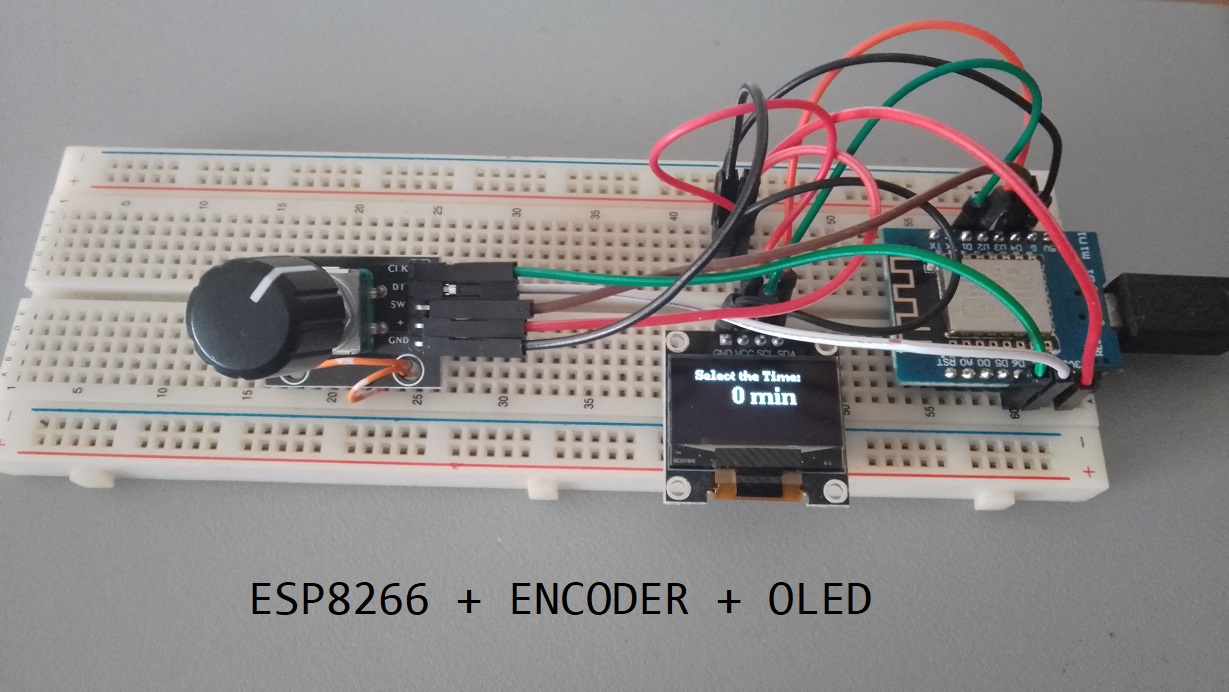
Timer with OLED Display +Encoder + Esp8266

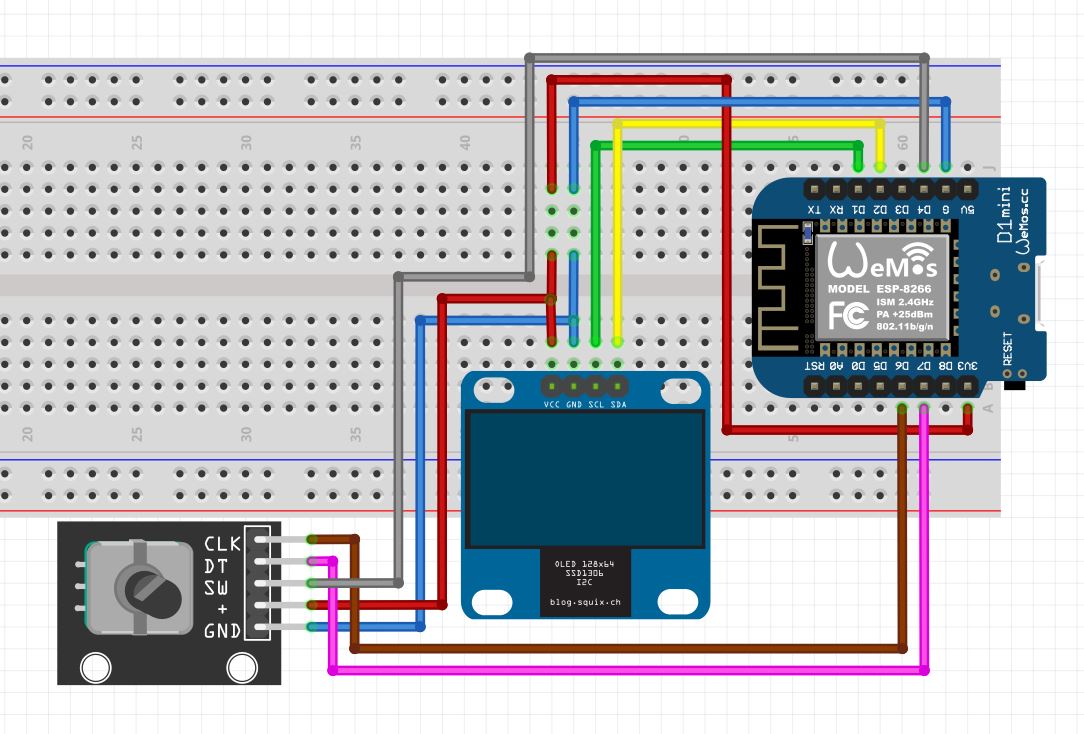
- Wemos D1 Mini:
- D4: Connect to the SW (Switch) pin of the KY-040 encoder.
- D6: Connect to the CLK (Clock) pin of the KY-040 encoder.
- D7: Connect to the DT (Data) pin of the KY-040 encoder.

Understanding the Code
Let’s break down the code into sections and explain its functionality:
1. Libraries and Constants
This section includes the necessary libraries, such as U8g2lib for OLED display support. It also defines constants for the screen dimensions and I2C address.
#include <U8g2lib.h>

#define SCREEN_WIDTH 128
#define SCREEN_HEIGHT 64
#define I2C_ADDRESS 0x3C  // Replace with the correct I2C address

U8G2_SSD1306_128X64_NONAME_F_HW_I2C u8g2(U8G2_R0, /* reset=*/U8X8_PIN_NONE);
2. Pin Definitions
Here, the pins for the KY-040 rotary encoder are defined. CLK and DT represent the clock and data pins, respectively, while SW corresponds to the switch (button) pin.
const int CLK = D6;
const int DT = D7;
const int SW = D4;
3. Variables Initialization
These variables store the encoder value, previous states of CLK and DT pins, button press status, countdown status, and timestamps for countdown start and duration.
int encoderValue = 0;
int lastCLKState;
int lastDTState;
bool buttonPressed = false;
bool timerRunning = false;
unsigned long countdownStartTime;
unsigned long countdownDuration = 0;
4. Setup Function
The setup function initializes the pins, Serial communication, and OLED display. It also sets up the initial display with a message to select the time.
void setup() {
  // ... (omitting unrelated setup code)

  // Initialize OLED display
  u8g2.begin();
  u8g2.setFont(u8g2_font_ncenB08_tr);
  u8g2.clearBuffer();
  u8g2.setCursor(15, 15);
  u8g2.print("Select the Time:");
  u8g2.setFont(u8g2_font_ncenB14_tr);
  u8g2.setCursor(55, 35);
  u8g2.print("0 min");
  u8g2.sendBuffer();
}
5. Loop Function
The loop function contains the main logic of the program. It checks for changes in the encoder state, updates the OLED display accordingly, handles the countdown logic when the timer is running, and manages the button press.
void loop() {
  // ... (omitting unrelated loop code)

  // Encoder logic and OLED display updates

  if (timerRunning) {
    // Countdown logic and OLED display updates
  }

  // Button press handling
}
6. Encoder and Display Update Logic
This section of the code checks for changes in the encoder state and updates the encoder value. It also updates the OLED display to reflect the selected time in minutes.
int currentStateCLK = digitalRead(CLK);
int currentStateDT = digitalRead(DT);

if (currentStateCLK != lastCLKState) {
  // Encoder rotation logic

  // OLED display update
}
7. Countdown Logic and Display Updates
If the countdown is active, this part of the code calculates the remaining time and updates the OLED display to show the countdown progress.
if (timerRunning) {
  // Countdown logic

  // OLED display update during countdown
}
8. Button Press Handling
This section handles the button press to start the countdown. It ensures that the countdown only starts when the button is pressed and the timer is not already running.
if (digitalRead(SW) == LOW && !buttonPressed && !timerRunning) {
  // Button press to start countdown

  // Countdown initiation and timestamp
} else if (digitalRead(SW) == HIGH && buttonPressed) {
  buttonPressed = false;
}
Complete Code (Updated):
- Added 60 min Upper Encoder Limit
#include <U8g2lib.h>

#define SCREEN_WIDTH 128
#define SCREEN_HEIGHT 64
#define I2C_ADDRESS 0x3C  // Replace with the correct I2C address

U8G2_SSD1306_128X64_NONAME_F_HW_I2C u8g2(U8G2_R0, /* reset=*/U8X8_PIN_NONE);

const int CLK = D6;
const int DT = D7;
const int SW = D4;

int encoderValue = 0;
int lastCLKState;
int lastDTState;
bool buttonPressed = false;
bool timerRunning = false;
unsigned long countdownStartTime;
unsigned long countdownDuration = 0;

void setup() {
  pinMode(CLK, INPUT);
  pinMode(DT, INPUT);
  pinMode(SW, INPUT_PULLUP);

  lastCLKState = digitalRead(CLK);
  lastDTState = digitalRead(DT);

  Serial.begin(115200);

  // Initialize OLED display
  u8g2.begin();
  //u8g2.setFont(u8g2_font_ncenB08_tr);
  u8g2.setFont(u8g2_font_ncenB08_tr);
  u8g2.clearBuffer();
  u8g2.setCursor(15, 15);
  u8g2.print("Select the Time:");
  u8g2.setFont(u8g2_font_ncenB14_tr);
  u8g2.setCursor(45, 35);
  u8g2.print("0 min");
  u8g2.sendBuffer();
}

void loop() {
  int currentStateCLK = digitalRead(CLK);
  int currentStateDT = digitalRead(DT);

  if (currentStateCLK != lastCLKState) {
    if (currentStateCLK == HIGH) {
      // On rising edge of CLK
      if (currentStateDT == LOW) {
        // Clockwise rotation
        encoderValue++;
      } else {
        // Counter-clockwise rotation
        encoderValue--;
      }

      // Ensure encoderValue is not negative
      if (encoderValue < 0) {
        encoderValue = 0;
      }

      // Limit encoderValue to 60 minutes
      if (encoderValue > 60) {
        encoderValue = 60;
      }

      Serial.print("Encoder Value: ");
      Serial.println(encoderValue);

      u8g2.setFont(u8g2_font_ncenB08_tr);
      u8g2.clearBuffer();
      u8g2.setCursor(15, 15);
      u8g2.print("Select the Time:");
      u8g2.setFont(u8g2_font_ncenB14_tr);
      u8g2.setCursor(45, 35);
      u8g2.print(encoderValue);
      u8g2.print(" min");
      u8g2.sendBuffer();

      // Convert encoder value to seconds (adjust the scale as needed)
      countdownDuration = encoderValue * 60;
    }
  }

  lastCLKState = currentStateCLK;
  lastDTState = currentStateDT;

  if (timerRunning) {
    unsigned long elapsedTime = millis() - countdownStartTime;

    if (elapsedTime < countdownDuration * 1000) {
      unsigned long remainingTime = (countdownDuration * 1000) - elapsedTime;
      int minutes = remainingTime / (60 * 1000);
      int seconds = (remainingTime % (60 * 1000)) / 1000;

      Serial.print("Remaining Time: ");
      Serial.print(minutes);
      Serial.print(" minutes and ");
      Serial.print(seconds);
      Serial.println(" seconds");

      // Update OLED display during countdown
      u8g2.clearBuffer();
      u8g2.setFont(u8g2_font_ncenB08_tr);
      u8g2.setCursor(15, 15);
      u8g2.print("Remaining Time: ");
      u8g2.setFont(u8g2_font_ncenB14_tr);
      u8g2.setCursor(35, 35);
      u8g2.print(minutes);
      u8g2.print("m ");
      u8g2.print(seconds);
      u8g2.print("s");
      u8g2.sendBuffer();
    } else {
      Serial.println("Countdown complete");
      timerRunning = false;
      Serial.println("Input enabled");

      // Display a message indicating countdown completion
      u8g2.clearBuffer();
      u8g2.setFont(u8g2_font_ncenB08_tr);
      u8g2.setCursor(0, 10);
      u8g2.print("Countdown Complete!");
      u8g2.sendBuffer();
    }
  }

  if (digitalRead(SW) == LOW && !buttonPressed && !timerRunning) {
    buttonPressed = true;
    timerRunning = true;
    countdownStartTime = millis();

    Serial.print("Countdown started for ");
    Serial.print(countdownDuration / 60);
    Serial.print(" minutes and ");
    Serial.print(countdownDuration % 60);
    Serial.println(" seconds");
  } else if (digitalRead(SW) == HIGH && buttonPressed) {
    buttonPressed = false;
  }

  delay(1);
}