Menu System with Esp8266 + Oled + Encoder
This menu system will allow users to navigate through different options and execute functions accordingly. This is a work in progress but usable.
Hardware Requirements
- ESP8266 Development Board (such as NodeMCU) (Affiliate) – https://s.click.aliexpress.com/e/_DD3JQhj
- OLED Display (128×64 pixels) (Affiliate) – https://s.click.aliexpress.com/e/_Dm4UE3J
- KY-040 rotary encoder (Affiliate) – https://s.click.aliexpress.com/e/_Dl3uGHB
- Breadboard and jumper wires (Affiliate) – https://s.click.aliexpress.com/e/_Dl5kuk1
Software Requirements
- Arduino IDE
- Libraries: Wire, Adafruit_GFX, Adafruit_SSD1306
Open the Arduino IDE and navigate to Sketch -> Include Library -> Manage Libraries. Search for and install the following libraries:
Adafruit_GFX
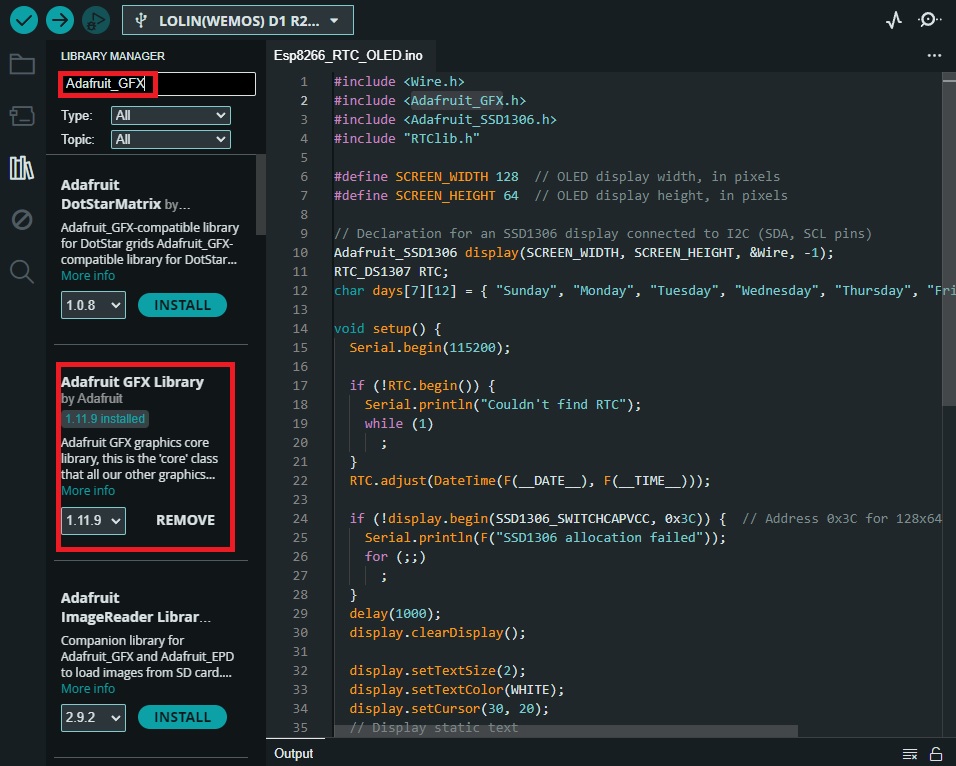
Adafruit_SSD1306

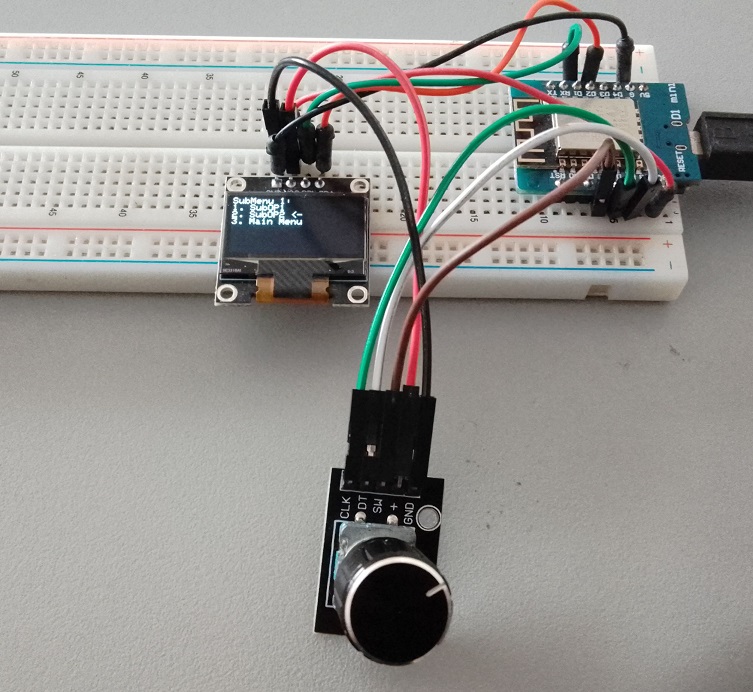
Setting up the Hardware
Connect the components as follows:
- CLK pin of KY-040 to D6
- DT pin of KY-040 to D7
- SW pin of KY-040 to D5
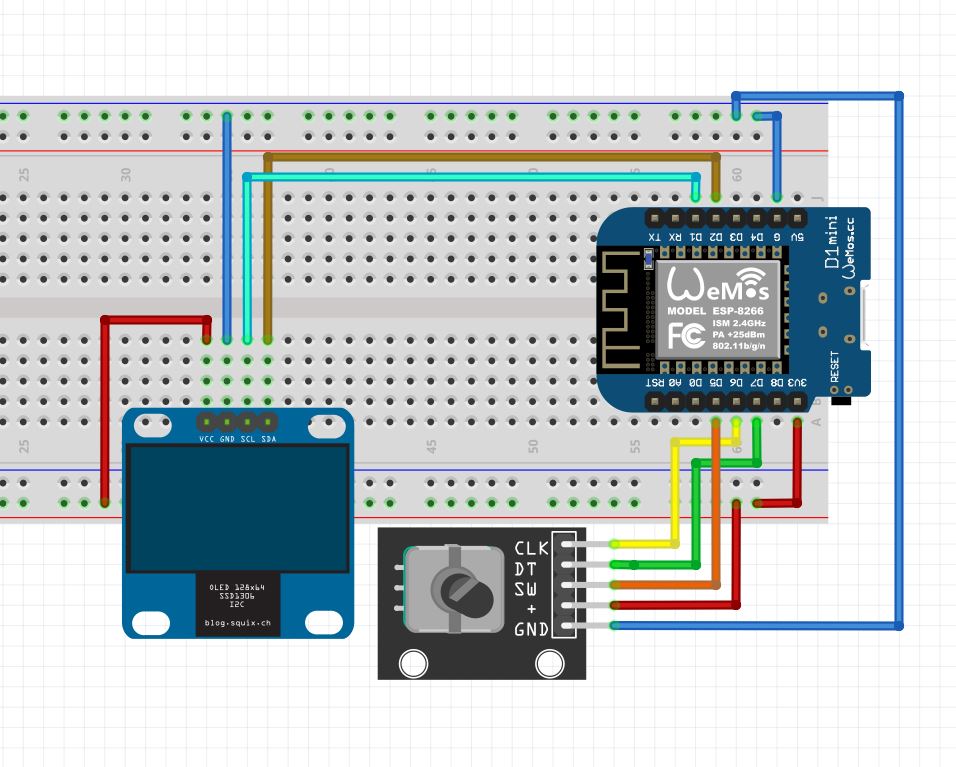
Connect OLED Display to Breadboard:
-
- Connect the VCC pin of the OLED display to the 3.3V pin on the Wemos D1 Mini.
- Connect GND on the OLED display to the GND pin on the Wemos D1 Mini.
- Connect SDA on the OLED display to the D2 pin on the Wemos D1 Mini.
- Connect SCL on the OLED display to the D1 pin on the Wemos D1 Mini.

Schematic
Writing the Code
WORK IN PROGRESS BUT STILL USABLE.
#include <Wire.h>
#include <Adafruit_GFX.h>
#include <Adafruit_SSD1306.h>

#define CLK D6 // CLK pin of KY-040 connected to D5 (GPIO14)
#define DT D7  // DT pin of KY-040 connected to D6 (GPIO12)
#define SW D5  // SW pin of KY-040 connected to D7 (GPIO13)

#define SCREEN_WIDTH 128  // OLED display width, in pixels
#define SCREEN_HEIGHT 64  // OLED display height, in pixels

Adafruit_SSD1306 display(SCREEN_WIDTH, SCREEN_HEIGHT, &Wire, -1);

int lastCLKState = LOW;
int lastDTState = LOW;
int mainMenuEncoderPos = 0;
int subMenu1EncoderPos = 0;
int subMenu2EncoderPos = 0;
int currentMenu = 0; // 0 for main menu, 1 for submenu 1, 2 for submenu 2

unsigned long lastDebounceTime = 0;
unsigned long debounceDelay = 200; // Adjust ENCODER debounce delay as needed

void setup() {
  pinMode(CLK, INPUT_PULLUP);
  pinMode(DT, INPUT_PULLUP);
  pinMode(SW, INPUT_PULLUP);

  Serial.begin(115200);

  if (!display.begin(SSD1306_SWITCHCAPVCC, 0x3C)) {
    Serial.println(F("SSD1306 allocation failed"));
    for (;;);
  }
  delay(1000);
  display.clearDisplay();

  display.setTextSize(1);
  display.setTextColor(WHITE);
  display.setCursor(0, 0);
  display.println("Menu:");
  display.println("1. OP1");
  display.println("2. OP2");
  display.display();
}

void loop() {
  int CLKState = digitalRead(CLK);
  int DTState = digitalRead(DT);

  if (CLKState != lastCLKState) {
    if (millis() - lastDebounceTime > debounceDelay) {
      if (DTState != CLKState) {
        switch (currentMenu) {
          case 0:
            mainMenuEncoderPos++;
            break;
          case 1:
            subMenu1EncoderPos++;
            break;
          case 2:
            subMenu2EncoderPos++;
            break;
        }
      } else {
        switch (currentMenu) {
          case 0:
            mainMenuEncoderPos--;
            break;
          case 1:
            subMenu1EncoderPos--;
            break;
          case 2:
            subMenu2EncoderPos--;
            break;
        }
      }
      displayMenu();
      lastDebounceTime = millis();
    }
  }

  lastCLKState = CLKState;
  lastDTState = DTState;

  // Check for button press to select menu option
  if (digitalRead(SW) == LOW) {
    if (currentMenu == 0) {
      executeSelectedOption();
    } else {
      executeSelectedSubOption();
    }
    delay(500); // Debounce delay for button press
  }
}

void displayMenu() {
  display.clearDisplay();
  display.setCursor(0, 0);
  switch (currentMenu) {
    case 0:
      if (mainMenuEncoderPos % 2 == 0) {
        display.println("Menu:");
        display.println("1. OP1 <-");
        display.println("2. OP2");
      } else {
        display.println("Menu:");
        display.println("1. OP1");
        display.println("2. OP2 <-");
      }
      break;
    case 1:
      if (subMenu1EncoderPos % 3 == 0) {
        display.println("SubMenu 1:");
        display.println("1. SubOP1 <-");
        display.println("2. SubOP2");
        display.println("3. Main Menu");
      } else if (subMenu1EncoderPos % 3 == 1) {
        display.println("SubMenu 1:");
        display.println("1. SubOP1");
        display.println("2. SubOP2 <-");
        display.println("3. Main Menu");
      } else {
        display.println("SubMenu 1:");
        display.println("1. SubOP1");
        display.println("2. SubOP2");
        display.println("3. Main Menu <-");
      }
      break;
    case 2:
      if (subMenu2EncoderPos % 3 == 0) {
        display.println("SubMenu 2:");
        display.println("1. SubOP3 <-");
        display.println("2. SubOP4");
        display.println("3. Main Menu");
      } else if (subMenu2EncoderPos % 3 == 1) {
        display.println("SubMenu 2:");
        display.println("1. SubOP3");
        display.println("2. SubOP4 <-");
        display.println("3. Main Menu");
      } else {
        display.println("SubMenu 2:");
        display.println("1. SubOP3");
        display.println("2. SubOP4");
        display.println("3. Main Menu <-");
      }
      break;
  }
  display.display();
}

void executeSelectedOption() {
  if (mainMenuEncoderPos % 2 == 0) {
    // Enter submenu 1
    currentMenu = 1;
    displayMenu();
  } else {
    // Enter submenu 2
    currentMenu = 2;
    displayMenu();
  }
}

void executeSelectedSubOption() {
  switch (currentMenu) {
    case 1:
      if (subMenu1EncoderPos % 3 == 0) {
        subOption1Function();
      } else if (subMenu1EncoderPos % 3 == 1) {
        subOption2Function();
      } else {
        currentMenu = 0; // Go back to main menu
        displayMenu();
      }
      break;
    case 2:
      if (subMenu2EncoderPos % 3 == 0) {
        subOption3Function();
      } else if (subMenu2EncoderPos % 3 == 1) {
        subOption4Function();
      } else {
        currentMenu = 0; // Go back to main menu
        displayMenu();
      }
      break;
  }
}

// Function for option 1
void option1Function() {
  // Add your code here for handling option 1
  display.clearDisplay();
  display.setCursor(0, 0);
  display.println("Option 1 Selected");
  display.display();
  delay(2000); // Delay to display the message
  displayMenu(); // Display menu again after executing option
}

// Function for option 2
void option2Function() {
  // Add your code here for handling option 2
  display.clearDisplay();
  display.setCursor(0, 0);
  display.println("Option 2 Selected");
  display.display();
  delay(2000); // Delay to display the message
  displayMenu(); // Display menu again after executing option
}

// Function for SubOption 1
void subOption1Function() {
  // Add your code here for handling SubOption 1
  display.clearDisplay();
  display.setCursor(0, 0);
  display.println("SubOption 1 Selected");
  display.display();
  delay(2000); // Delay to display the message
  displayMenu(); // Display menu again after executing option
}

// Function for SubOption 2
void subOption2Function() {
  // Add your code here for handling SubOption 2
  display.clearDisplay();
  display.setCursor(0, 0);
  display.println("SubOption 2 Selected");
  display.display();
  delay(2000); // Delay to display the message
  displayMenu(); // Display menu again after executing option
}

// Function for SubOption 3
void subOption3Function() {
  // Add your code here for handling SubOption 3
  display.clearDisplay();
  display.setCursor(0, 0);
  display.println("SubOption 3 Selected");
  display.display();
  delay(2000); // Delay to display the message
  displayMenu(); // Display menu again after executing option
}

// Function for SubOption 4
void subOption4Function() {
  // Add your code here for handling SubOption 4
  display.clearDisplay();
  display.setCursor(0, 0);
  display.println("SubOption 4 Selected");
  display.display();
  delay(2000); // Delay to display the message
  displayMenu(); // Display menu again after executing option
}
Understanding the Code
- The code initializes the OLED display and sets up the rotary encoder and push button.
- It defines menu navigation logic and functions for executing menu options.
- Options and sub-options are displayed on the OLED screen, and users can navigate through them using the rotary encoder.
- When a menu option is selected, the corresponding function is executed.
Customizing the Code
- Modify the menu options and functions according to your project requirements.
- You can add more menu levels or options by extending the code logic.
- Customize the OLED display layout and appearance to suit your preferences.
Uploading the Code
- Connect your Wemos D1 Mini to your computer via USB.
- Open the Arduino IDE and select the appropriate board and port.
- Copy the provided code into a new sketch and verify it for any errors.
- Upload the code to your Wemos D1 Mini.
Testing the Menu System
- After uploading the code, power up your Wemos D1 Mini.
- You should see the main menu displayed on the OLED screen.
- Rotate the encoder to navigate through the options and press the button to select.
- Verify that the selected options execute the corresponding functions properly.
Conclusion
In this tutorial, we’ve demonstrated how to create a menu system using a Wemos D1 Mini and OLED display. With this menu system, you can easily add a user interface to your IoT projects, allowing for intuitive interaction and control. Feel free to customize the code and hardware to fit your specific project needs.