
Event Counter with ESP8266 + HC-SR501 + Buzzer + TM1637
In this guide, we’ll be walking through the steps on creating an event counter project using an ESP8266, HC-SR501 PIR (Passive Infrared) Motion Sensor, a buzzer, and a TM16374-digit LED display. This setup can count and display the number of times an event (in this case motion detected) occurs.
Components:
- ESP8266 Development Board (such as NodeMCU) (Affiliate) – https://s.click.aliexpress.com/e/_DD3JQhj
- TM1637 display module (Affiliate) – https://s.click.aliexpress.com/e/_DCwvPgx
- KY-006 Buzzer (Affiliate) – https://s.click.aliexpress.com/e/_DmslOFz
- HC-SR501 PIR Sensor (Affiliate) – https://s.click.aliexpress.com/e/_DnS5GIF
- Breadboard and jumper wires (Affiliate) – https://s.click.aliexpress.com/e/_Dl5kuk1
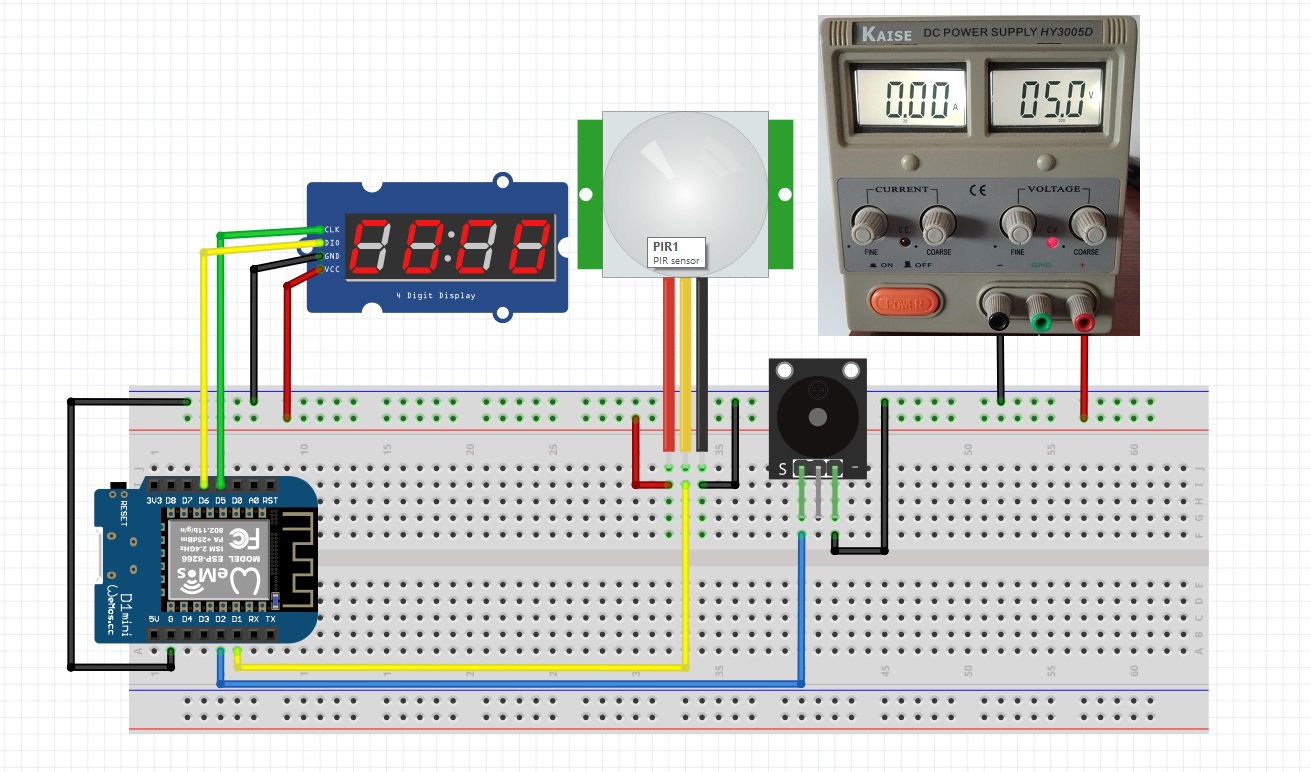
Wiring diagram
First, you’ll need to connect all the components. The wiring diagram should look like this:
- Vcc (HC-SR501) to +5V External Regulated Power Source for the sensor to behave correctly (Or from the 5V pin of the Esp8266 but I don´t recommend it).
- GND (HC-SR501) to GND (ESP8266)/Global
- OUT (HC-SR501) to D1 (ESP8266)
- Vcc (Buzzer) to D2 (ESP8266)
- GND (Buzzer) to GND/Global (ESP8266)
- Vcc (TM1637) to +5V External Regulated Power Source
- GND (TM1637) to GND (ESP8266)/Global
- DIO (TM1637) to D6 (ESP8266)
- CLK (TM1637 to D5 (ESP8266)
Let’s begin with the code:
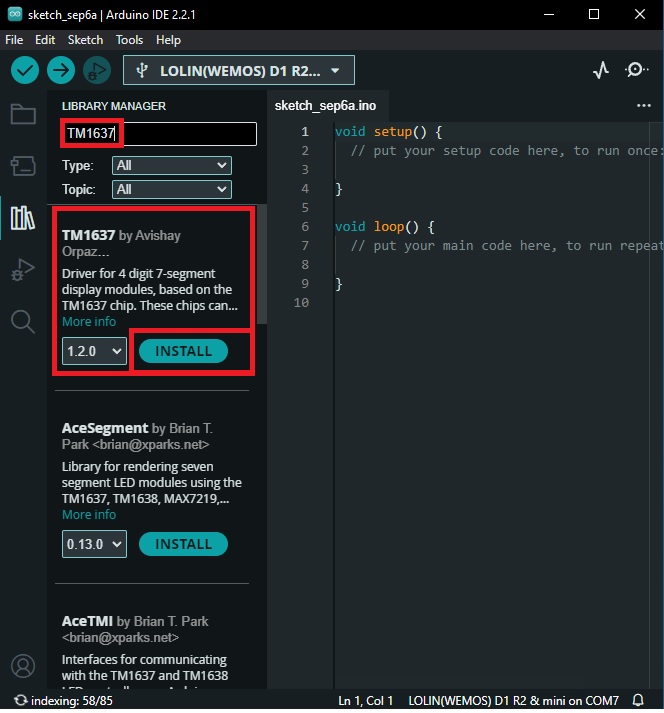
Step 1: Include Libraries
- Open the Arduino IDE, go to “Sketch” → “Include Library” → “Manage Libraries” and search for “TM1637”.
- Install the library authored by “Avishay” latest version.
Here, TM1637Display.h is a library for the 4-digit display
#include <TM1637Display.h>
Step 2: Define Constants and Variables
const int CLK_PIN = D5;  // CLK pin connected to D5
const int DIO_PIN = D6;  // DIO pin connected to D6
const int pirPin = D1;     // PIR sensor pin
const int buzzerPin = D2;  // Buzzer pin

int counter = 0; // initialize counter to 0
Step 3: Initialize the display and set up the pin modes
TM1637Display display(CLK_PIN, DIO_PIN);  // Initialize the TM1637 display

void setup() {
  display.setBrightness(7); // Set display brightness (0-7)
  pinMode(pirPin, INPUT);
  pinMode(buzzerPin, OUTPUT);
  Serial.begin(115200);
  display.showNumberDec(counter);
}
Step 4: Loop Function Code
void loop() {
  int motionDetected = digitalRead(pirPin);
  if (motionDetected == HIGH) {

    counter++;
    display.showNumberDec(counter);

    Serial.println("Motion Detected!");
    for (int i = 0; i < 100; i++) {  // make a sound
        digitalWrite(buzzerPin, HIGH); // send high signal to buzzer
        delay(1); // delay 1ms
        digitalWrite(buzzerPin, LOW); // send low signal to buzzer
        delay(1);
    }
    delay(50);
    for (int j = 0; j < 100; j++) { //make another sound
        digitalWrite(buzzerPin, HIGH);
        delay(2); // delay 2ms
        digitalWrite(buzzerPin, LOW);
        delay(2);
    }
    delay(500);
  } else {
    Serial.println("No Motion Detected.");
  }
  delay(1000);  // Delay between readings
}
This script waits for an event (motion detected After the event occurs, it increases the counter by one and displays the updated value on the display. The buzzer also buzzes to signal the detection of motion.
Complete Code
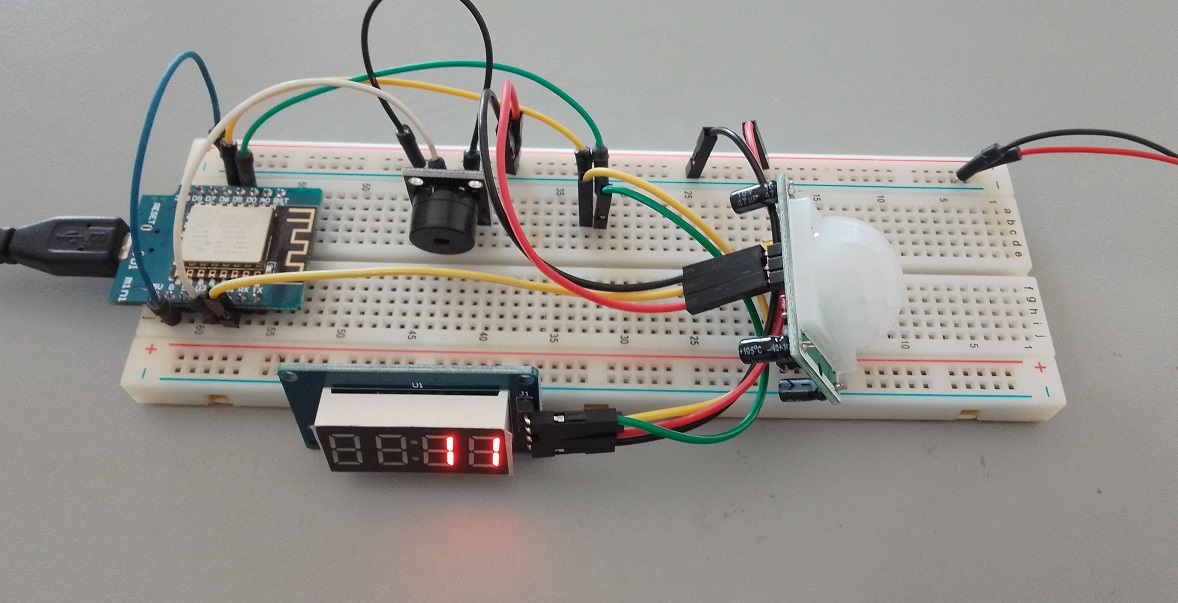
Now, load the code to the ESP8266 module. Upon motion detection, the HC-SR501 triggers the buzzer and also sends a signal to ESP8266 to increment the count and display it on the TM1637 display.
#include <TM1637Display.h>

const int CLK_PIN = D5;  // CLK pin connected to D5
const int DIO_PIN = D6;  // DIO pin connected to D6
const int pirPin = D1;     // PIR sensor pin
const int buzzerPin = D2;  // Buzzer pin

int counter = 0; // initialize counter to 0

TM1637Display display(CLK_PIN, DIO_PIN);  // Initialize the TM1637 display

void setup() {
  display.setBrightness(7); // Set display brightness (0-7)
  pinMode(pirPin, INPUT);
  pinMode(buzzerPin, OUTPUT);
  Serial.begin(115200);
  display.showNumberDec(counter);
}

void loop() {
  int motionDetected = digitalRead(pirPin);
  if (motionDetected == HIGH) {

    counter++;
    display.showNumberDec(counter);

    Serial.println("Motion Detected!");
    for (int i = 0; i < 100; i++) {  // make a sound
        digitalWrite(buzzerPin, HIGH); // send high signal to buzzer
        delay(1); // delay 1ms
        digitalWrite(buzzerPin, LOW); // send low signal to buzzer
        delay(1);
    }
    delay(50);
    for (int j = 0; j < 100; j++) { //make another sound
        digitalWrite(buzzerPin, HIGH);
        delay(2); // delay 2ms
        digitalWrite(buzzerPin, LOW);
        delay(2);
    }
    delay(500);
  } else {
    Serial.println("No Motion Detected.");
  }
  delay(1000);  // Delay between readings
}
Conclusion:
That’s it! You’ve successfully set up a project with an ESP8266 that uses a HC-SR501 to count the number of events and display the count using a TM1637 display! You can also extend this project and add more sensors or create a web server on ESP8266 to check the count remotely. The possibilities are endless.