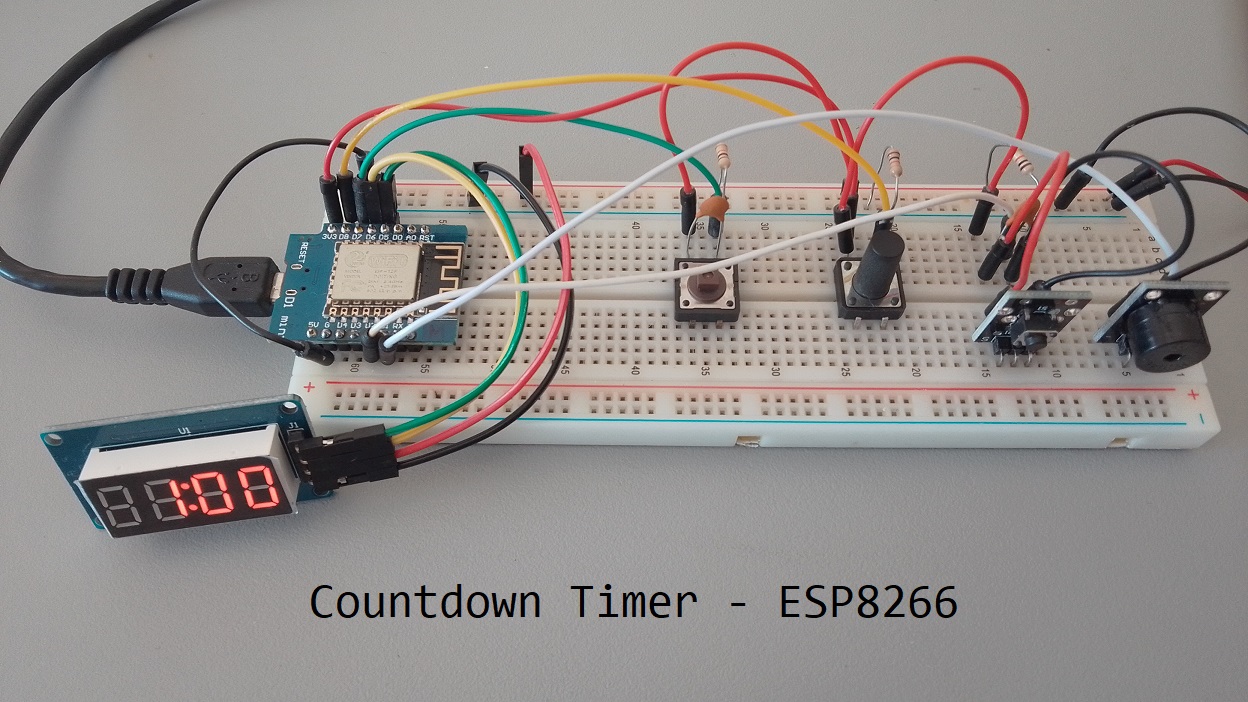
Countdown Timer with Esp8266 and TM1637 Display
A countdown timer can be a handy tool for various purposes, from cooking to workout routines. In this tutorial, we’ll show you how to create a countdown timer using a Wemos D1 Mini, a TM1637 display, and three buttons. Users will be able to set a specific time duration and then start the countdown. The stop button is available but It isn’t perfect, it is a mere experiment. Maybe later I will fix it.
Components Needed
- ESP8266 Development Board (such as NodeMCU) (Affiliate) – https://s.click.aliexpress.com/e/_DD3JQhj
- TM1637 display module (Affiliate) – https://s.click.aliexpress.com/e/_DCwvPgx
- KY-006 Buzzer (Affiliate) – https://s.click.aliexpress.com/e/_DmslOFz
- Breadboard and jumper wires (Affiliate) – https://s.click.aliexpress.com/e/_Dl5kuk1
- 3 – Push Buttons (for incrementing time, starting, and stopping the timer)
- 3 – 10K Ohm Resistors
- 2 – 10 nF Capacitors (103 Code) to help with the Debouncing of some of the buttons, that is the removing of unwanted input noise. (OPTIONAL)
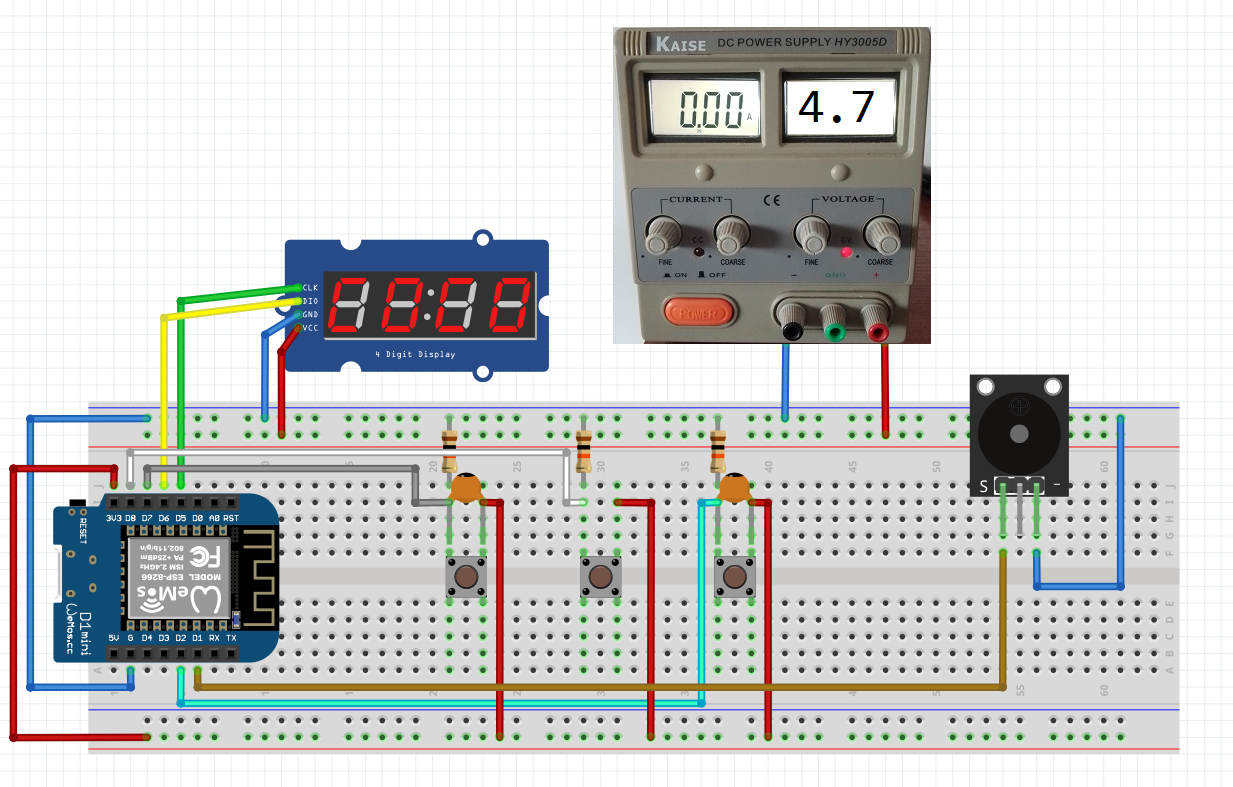
Circuit Diagram
- Connect the TM1637 Display:
- Connect the CLK (Clock) pin of the TM1637 display to pin D5 on the ESP8266.
- Connect the DIO (Data Input/Output) pin of the TM1637 display to pin D6 on the ESP8266.
- Connect VCC to a +4.7V External Regulated Power Supply (or to 5V on the Esp8266 <- not recommended because this Wemos D1 Mini is only 3.3v logic tolerant, we can see this on the tm1637 Datasheet that the logic value is 0.7*VCC witch give us approx. +3.3v of Logic Level Voltage and this is OK if we don´t want to burn the Little Guy)
- Connect the GND pin of the TM1637 to the GND pin of the ESP8266/Global GND.
- Connect the Push Buttons (Better to follow the diagram bellow):
- Connect one terminal of the button used for incrementing time to pin D7 on the ESP8266.
- Connect one terminal of the button used for selecting and starting the timer to pin D8 on the ESP8266.
- Connect one terminal of the button used for stopping and resetting the timer to pin D2 on the ESP8266.
- Connect the other terminals of these buttons to the ground (GND) on the ESP8266.
- Connect the Buzzer (Optional):
- If you’re using a buzzer for audio alerts, connect one terminal of the buzzer to pin D1 on the ESP8266 .
- Connect the other terminal of the buzzer to GND on the ESP8266.
- Power Supply (Better to follow the diagram bellow):
- Connect the 3.3V or 4.7 power supply (depending on your components) to the respective power pins on the ESP8266 (usually labeled as 3V3 or 5V).
- Connect the ground (GND) from your power supply to a ground (GND) pin on the ESP8266.
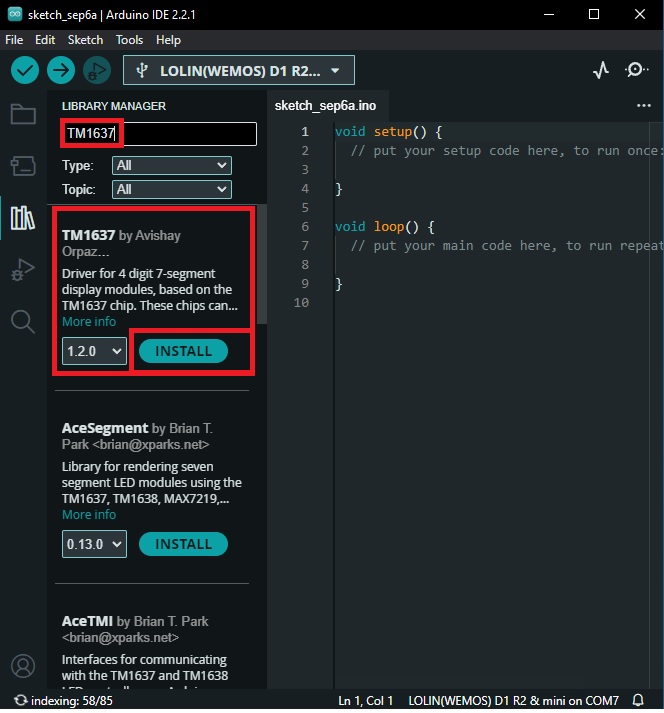
Installing Libraries
To control the TM1637 display module, we need to install the “TM1637Display” library.
- Open the Arduino IDE, go to “Sketch” → “Include Library” → “Manage Libraries” and search for “TM1637”.
- Install the library authored by “Avishay” latest version.
Writing the Code
#include <TM1637Display.h>

#define CLK_PIN 14           // CLK pin of the TM1637 display
#define DIO_PIN 12           // DIO pin of the TM1637 display
#define BUTTON_INC_PIN 13    // Button to increment time
#define BUTTON_SELECT_PIN 15 // Button to select and start timer
#define STOP_BUTTON_PIN 4    // Button to stop and reset timer
#define BUZZER_PIN 5         // Pin to control the buzzer

#define MAX_MINUTES 60
#define BRIGHTNESS_LEVEL 0x0A

volatile bool stopButtonPressed = false;
volatile unsigned long stopButtonPressTime = 0;

TM1637Display display(CLK_PIN, DIO_PIN);

int selectedMinutes = 1;
int selectedSeconds = 0;
unsigned long startTime = 0;
bool timerRunning = false;

bool lastButtonIncState = LOW;
bool lastButtonSelectState = LOW;
bool lastStopButtonState = HIGH; // Added variable to track the previous state of the stop button

int lastDisplayValue = -1;

void ICACHE_RAM_ATTR stopButtonInterrupt() {
  // Read the current state of the stop button
  bool stopButtonState = digitalRead(STOP_BUTTON_PIN);

  // Check if the stop button has just been pressed (falling edge)
  if (stopButtonState == LOW && lastStopButtonState == HIGH) {
    if (timerRunning) {
      // If the timer is running, force stop and reset it
      //display.clear();
      stopTimer(); // Force stop
      resetTimer(); // Force reset
      Serial.println("Stop button pressed. Timer stopped and reset.");
    }
  }

  // Update the previous state of the stop button
  lastStopButtonState = stopButtonState;
}

void setup() {
  Serial.begin(115200);
  display.setBrightness(BRIGHTNESS_LEVEL);
  displayTime(selectedMinutes * 60 + selectedSeconds); // Display the initial time with the colon separator

  pinMode(BUTTON_INC_PIN, INPUT_PULLUP);
  pinMode(BUTTON_SELECT_PIN, INPUT_PULLUP);
  pinMode(STOP_BUTTON_PIN, INPUT_PULLUP);
  pinMode(BUZZER_PIN, OUTPUT);

  attachInterrupt(digitalPinToInterrupt(STOP_BUTTON_PIN), stopButtonInterrupt, CHANGE); // Changed to CHANGE
}

void loop() {
  bool buttonIncState = digitalRead(BUTTON_INC_PIN);
  bool buttonSelectState = digitalRead(BUTTON_SELECT_PIN);

  if (buttonIncState == HIGH && lastButtonIncState == LOW && !timerRunning) {
    incrementSelectedMinutes();
    Serial.println("Increment button pressed.");
  }

  if (buttonSelectState == HIGH && lastButtonSelectState == LOW && !timerRunning) {
    startTimer();
    Serial.println("Select button pressed. Timer started.");
  }

  if (stopButtonPressed) {
    unsigned long buttonHoldTime = millis() - stopButtonPressTime;

    if (buttonHoldTime >= 1000) { // Long press (1 second or more)
      stopTimer();
      resetTimer();
      Serial.println("Stop button long press. Timer stopped and reset.");
    } else if (timerRunning) {
      stopTimer();
      Serial.println("Stop button short press. Timer stopped.");
    } else {
      startTimer();
      Serial.println("Stop button short press. Timer started.");
    }

    stopButtonPressed = false;
  }

  lastButtonIncState = buttonIncState;
  lastButtonSelectState = buttonSelectState;

  if (timerRunning) {
    unsigned long currentTime = millis();
    unsigned long elapsedTime = (currentTime - startTime) / 1000;

    if (elapsedTime <= (selectedMinutes * 60 + selectedSeconds)) {
      int remainingTime = (selectedMinutes * 60 + selectedSeconds) - elapsedTime;
      displayTime(remainingTime);
    } else {
      displayTime(0);
      timerRunning = false;
      Serial.println("Timer finished.");
      activateBuzzer(); // Timer reached zero, activate the buzzer
    }
  }
}

void incrementSelectedMinutes() {
  selectedMinutes++;
  if (selectedMinutes > MAX_MINUTES) {
    selectedMinutes = MAX_MINUTES;
  }
  displayTime(selectedMinutes * 60 + selectedSeconds);
}

void startTimer() {
  startTime = millis();
  timerRunning = true;
}

void stopTimer() {
  timerRunning = false;
}

void resetTimer() {
  selectedMinutes = 1;
  selectedSeconds = 0;
  displayTime(selectedMinutes * 60 + selectedSeconds);
  timerRunning = false;
}

void activateBuzzer() {
  tone(BUZZER_PIN, 1000); // Turn on the buzzer at 1000 Hz
  delay(1000);           // Keep the buzzer on for 1 second
  noTone(BUZZER_PIN);    // Turn off the buzzer
}

int formatTime(int timeInSeconds) {
  int minutes = timeInSeconds / 60;
  int seconds = timeInSeconds % 60;
  return minutes * 100 + seconds;
}

void displayTime(int timeInSeconds) {
  int minutes = timeInSeconds / 60;
  int seconds = timeInSeconds % 60;

  // Check if the remaining time is zero
  if (minutes == 0 && seconds == 0 && timerRunning) {
    display.showNumberDecEx(100, 0b01000000, false, 4); // Display "1:00" when the timer reaches zero
    return; // Exit the function early
  }

  // Format the time as "MM:SS"
  int displayValue = minutes * 100 + seconds;

  if (displayValue != lastDisplayValue) {
    // Display the formatted time with a colon ":" separator
    display.showNumberDecEx(displayValue, 0b01000000, false, 4); // 0b01000000 is the colon symbol
    lastDisplayValue = displayValue;
  }
}
How the Code Works
This script is for an Arduino-based countdown timer utilizing a 4-digit 7-segment display that uses the TM1637 chip, controlled using three buttons: increment, select, and stop. It also features a buzzer that plays a sound when the countdown ends.
Let’s breakdown the script:
-
Header: The
<TM1637Display.h>library allows the Arduino to control the TM1637 display. -
Pin Definitions: Defines which Arduino pins are connected to the buttons, the TM1637 display, and the buzzer.
-
Constants and Variables: Various constants and variables for things like maximum minutes, brightness of the display, timer parameters, button states, and buzzer state.
-
Setup Function: This runs once when the script starts or the Arduino is reset. It initializes the serial communication, sets the initial brightness of the display, sets up the button and buzzer pins as inputs or outputs, and attaches an interrupt to the stop button. An interrupt here is a sort of trigger that will immediately stop the current process and call a specific function (‘stopButtonInterrupt’) whenever the stop button changes state (when it is pressed or released).
-
Loop Function: This function runs in an infinite loop as long as the Arduino is powered on – the script mentions button handling, timer logic, and display updates, but the actual content is not provided in this code snippet.
-
Functions Defined:
incrementSelectedMinutes(): Increments the timer by one minute.startTimer(): Starts the timer.stopTimer(): Stops the timer.resetTimer(): Resets the timer to its initial state.activateBuzzer(): Activates the buzzer for one second.displayTime(): Takes a time in seconds, calculates minutes and seconds from this, and displays it on the TM1637 display, using appropriate formatting.
-
Interrupt Handler (
stopButtonInterrupt()) is triggered when the stop button is pressed. If the timer is running, it’s stopped and reset. Then, the state of the interrupt (stop button) gets updated.
Uploading the Code
- Open the Arduino IDE and select the appropriate board (Wemos D1 Mini) and port.
- Copy and paste the code into the IDE.
- Click the “Upload” button to upload the code to your Wemos D1 Mini.
Testing the Countdown Timer
- Power up your Wemos D1 Mini using a micro USB cable.
- The TM1637 display should show “1:00” initially. Press the increment button to set the desired countdown time.
- Press the select button to start the countdown timer.
- The display will show the remaining time, and when the timer reaches zero, it will stop and activate de Buzzer.
Conclusion
You’ve successfully built a countdown timer using a Wemos D1 Mini, TM1637 display, and two buttons. You can customize this timer for various applications such as cooking or workouts. Enjoy using your new countdown timer.