Connecting ESP8266 to a BMP280 Sensor and LCD
In this tutorial, we will learn how to connect an ESP8266 microcontroller with a BMP280 pressure and temperature sensor and a 2004 LCD display. We will use the Arduino IDE for programming the ESP8266.
Components Required
- ESP8266 development board (e.g., NodeMCU or Wemos D1 Mini) (Affiliate) – https://s.click.aliexpress.com/e/_DD3JQhj
- BMP280 Pressure and Temperature Sensor (Affiliate) – https://s.click.aliexpress.com/e/_DDVxAVX

- 2004 LCD module (with I2C interface) – (Affiliate) – https://s.click.aliexpress.com/e/_DE4GaZb
- Breadboard and jumper wires (Affiliate) – https://s.click.aliexpress.com/e/_Dl5kuk1
Inicial Wiring (Optional)
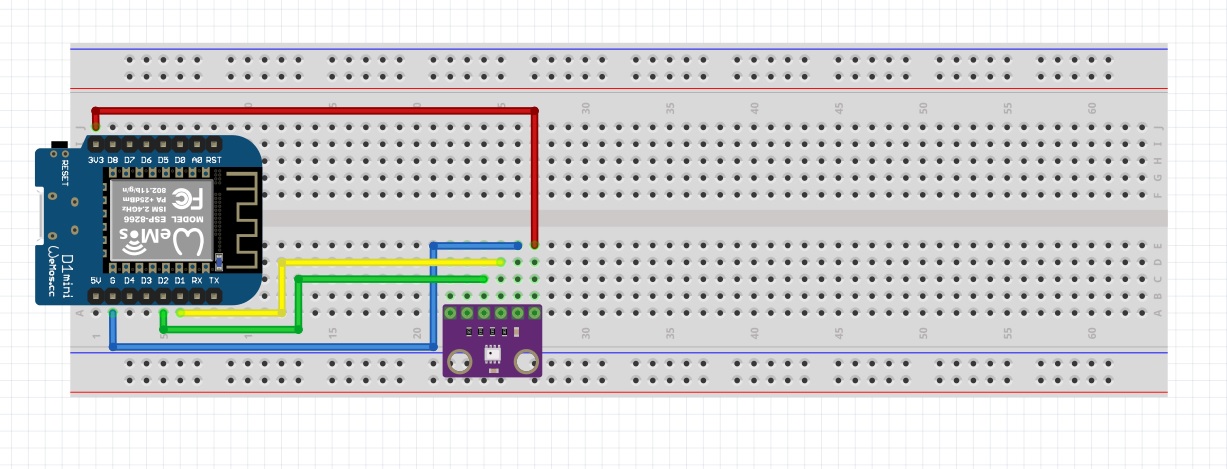
BMP280 to ESP8266
The BMP280 sensor communicates with the ESP8266 via I2C communication. Connect the BMP280 and ESP8266 as follows:
- VCC (BMP280) to 3.3V (ESP8266)
- GND (BMP280) to GND (ESP8266)
- SDA (BMP280) to D2 (ESP8266)
- SCL (BMP280) to D1 (ESP8266)
BMP280 I2C Address
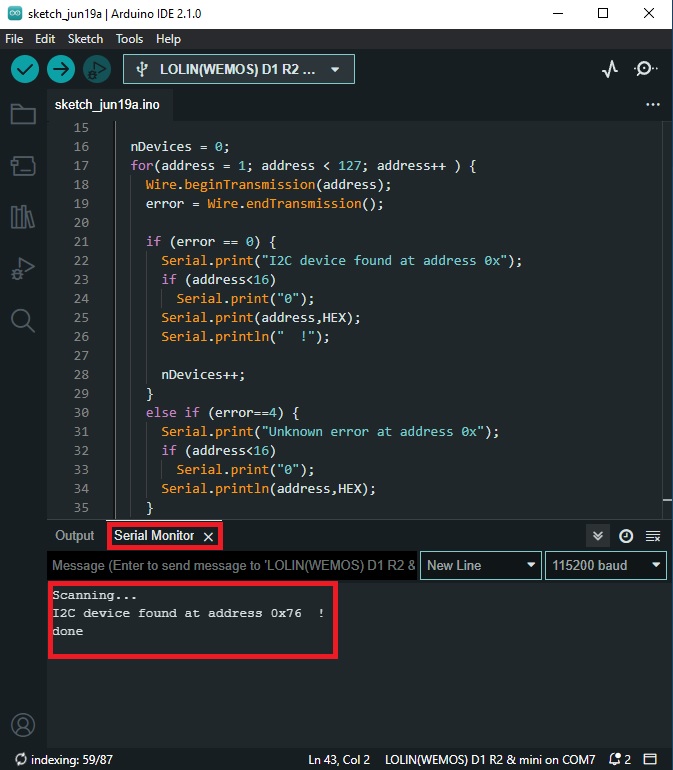
To find the I2C address of a BMP280 sensor, you can use an I2C scanner sketch. This sketch will scan the I2C bus for devices and print out their addresses. Here’s a simple I2C scanner sketch:
#include <Wire.h>

void setup() {
  Wire.begin();
  Serial.begin(115200);
  while (!Serial); // Wait for serial monitor to open
  Serial.println("\nI2C Scanner");
}

void loop() {
  byte error, address;
  int nDevices;

  Serial.println("Scanning...");

  nDevices = 0;
  for(address = 1; address < 127; address++ ) {
    Wire.beginTransmission(address);
    error = Wire.endTransmission();

    if (error == 0) {
      Serial.print("I2C device found at address 0x");
      if (address<16)
        Serial.print("0");
      Serial.print(address,HEX);
      Serial.println("  !");

      nDevices++;
    }
    else if (error==4) {
      Serial.print("Unknown error at address 0x");
      if (address<16)
        Serial.print("0");
      Serial.println(address,HEX);
    }
  }
  if (nDevices == 0)
    Serial.println("No I2C devices found\n");
  else
    Serial.println("done\n");

  delay(5000); // Wait 5 seconds for next scan
}
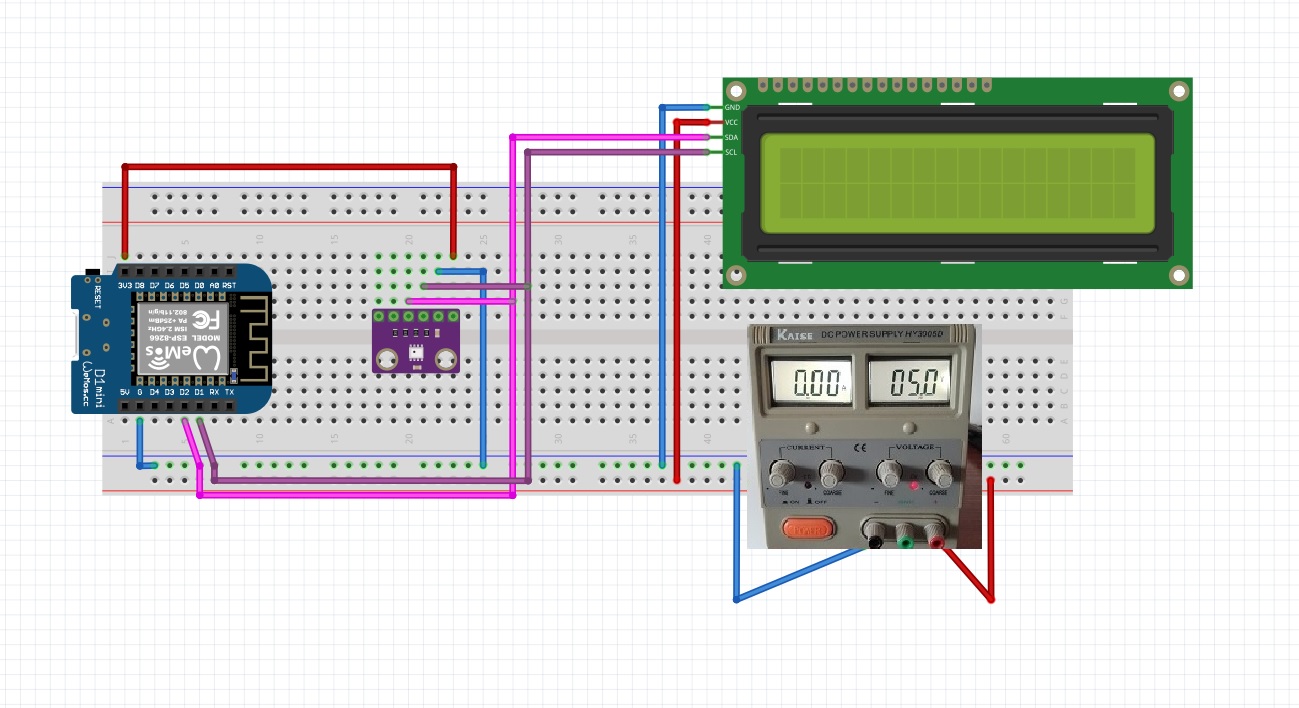
Final Wiring
BMP280 to ESP8266
The BMP280 sensor communicates with the ESP8266 via I2C communication. Connect the BMP280 and ESP8266 as follows:
- VCC (BMP280) to 3.3V (ESP8266)
- GND (BMP280) to GND (ESP8266)
- SDA (BMP280) to D2 (ESP8266)
- SCL (BMP280) to D1 (ESP8266)
LCD 2004 to ESP8266 (External regulated power source)
The LCD 2004 also uses I2C communication. Connect the LCD and ESP8266 as follows:
- VCC (LCD) to 5V
- GND (LCD) to GND
- SDA (LCD) to D2 (ESP8266)
- SCL (LCD) to D1 (ESP8266)
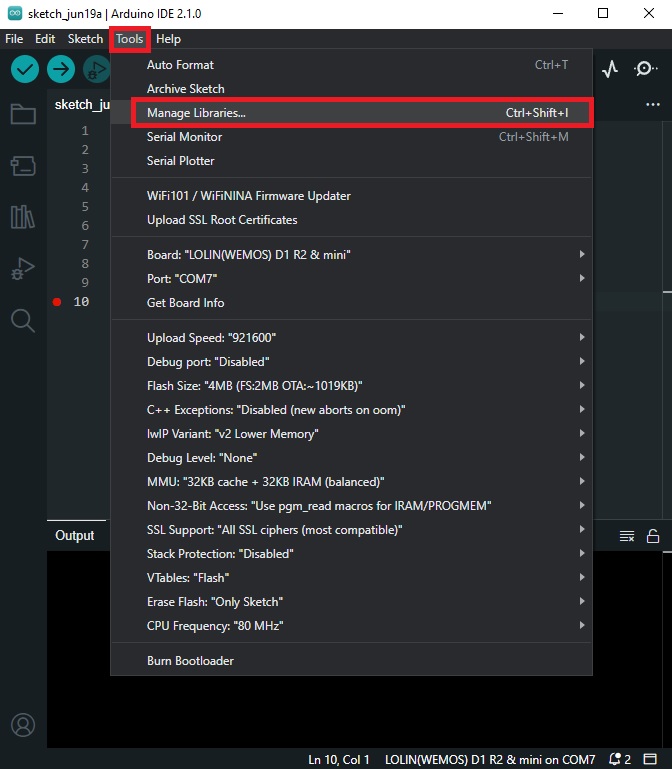
Libraries Required
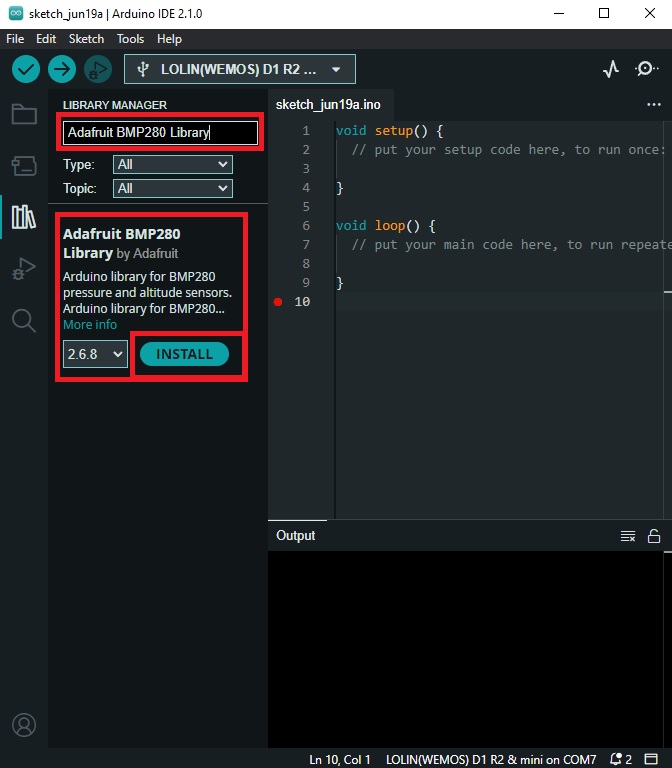
- Adafruit BMP280 Library: This library is used to interface the BMP280 sensor with the ESP8266.
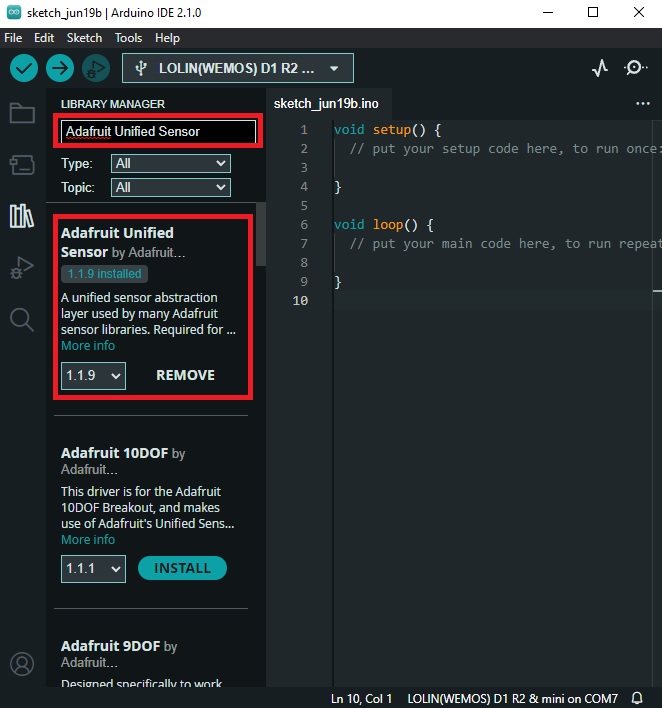
- Adafruit Unified Sensor Library: This library is required by the BMP280 library.
- LiquidCrystal_I2C Library: This library is used to control the LCD display.
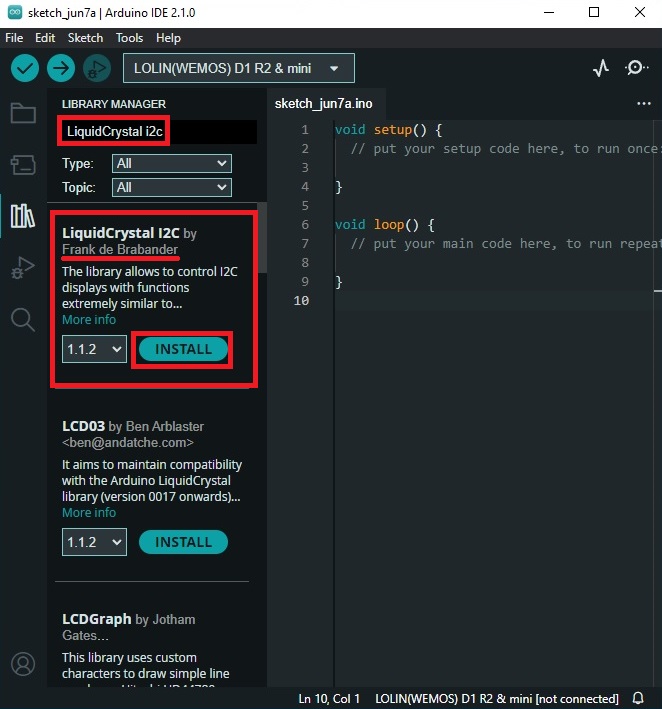
You can install these libraries through the Arduino IDE’s Library Manager.
Code
After setting up the hardware and installing the required libraries, upload the following code to the ESP8266:
#include <Wire.h>
#include <Adafruit_Sensor.h>
#include <Adafruit_BMP280.h>
#include <LiquidCrystal_I2C.h>
#define hPA 1;
#define Bar 0.001;
float BAR_Show;
//Pressure in BAR
//BAR_Show=(((bmp.readPressure() / 100.0F)*Bar)/hPA);
#define SEALEVELPRESSURE_HPA (1010)
Adafruit_BMP280 bmp; // I2C
LiquidCrystal_I2C lcd(0x27, 20, 4); // I2C address 0x27, 20 column and 4 rows
void setup() {
Serial.begin(115200);
lcd.begin(20, 4);
lcd.init();
// Initialize 2004 LCD display
lcd.init();
lcd.backlight();
lcd.setCursor(0, 0);
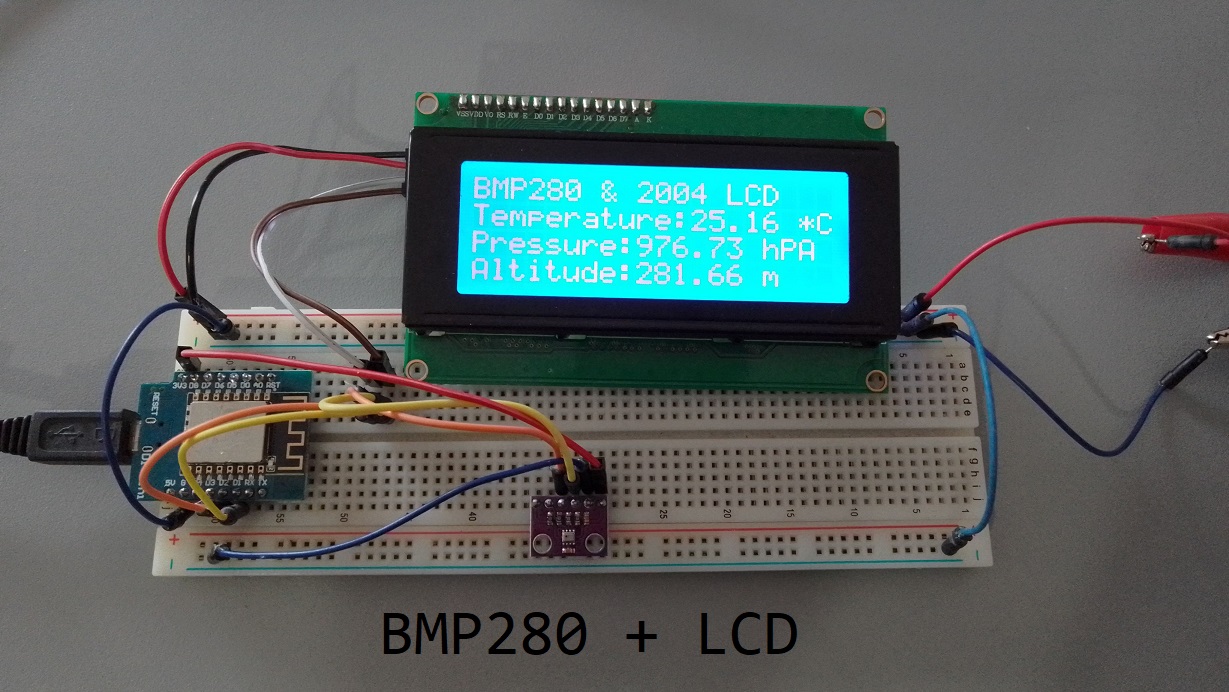
lcd.print("BMP280 & 2004 LCD");
lcd.setCursor(0, 1);
lcd.print("Temperature:");
lcd.setCursor(0, 2);
lcd.print("Pressure:");
lcd.setCursor(0, 3);
lcd.print("Altitude:");
if (!bmp.begin(0x76)) {
Serial.println("Could not find a valid BMP280 sensor, check wiring!");
while (1);
}
}
void loop() {
lcd.setCursor(12, 1);
lcd.print(bmp.readTemperature());
lcd.print(" *C");
lcd.setCursor(9, 2);
lcd.print(bmp.readPressure() / 100.0F);
lcd.print(" hPA");
lcd.setCursor(9, 3);
lcd.print(bmp.readAltitude(SEALEVELPRESSURE_HPA));
lcd.print(" m");
delay(1000);
}
Explanation
- The code begins by including the necessary libraries. The Adafruit BMP280 library is used to interface with the BMP280 sensor, and the LiquidCrystal_I2C library is used to control the LCD display.
- In the setup function, we initialize the serial communication for debugging purposes and the LCD display. We also check if the BMP280 sensor is correctly connected.
- In the loop function, we read the temperature, pressure, and altitude data from the BMP280 sensor and display it on the LCD. The temperature is displayed in Celsius, the pressure in hPa, and the altitude in meters. The data is updated every 1 second.
- In this code, you can adjust the SEALEVELPRESSURE_HPA variable to the current sea level pressure at your location. This will give you a more accurate altitude reading. The bmp.readAltitude(SEALEVELPRESSURE_HPA) function calculates the altitude based on the pressure at sea level.
- In this code, replace “0x76” with the I2C address of your BMP280 sensor.
- The bmp.begin() function initializes the sensor and returns true if the sensor is found and false otherwise.
- The bmp.readTemperature(), bmp.readPressure(), and bmp.readAltitude() functions are used to read the temperature, pressure, and approximate altitude, respectively.
Calibration
- The BMP280 sensor is factory calibrated, but you can fine-tune the readings for your specific location and conditions. To calibrate the altitude reading, you’ll need to know the current sea level pressure at your location, which you can find online. Once you have this value, you can adjust the sea level pressure value in the sketch.
- For temperature and pressure, the BMP280 is generally accurate out of the box. However, if you notice consistent discrepancies in your readings, you may need to apply a correction factor. This can be done by comparing the BMP280 readings to a known accurate source and adjusting the readings in your code accordingly.
Troubleshooting
If you encounter any issues, consider the following troubleshooting steps:
-
Check the wiring: Ensure that all connections are secure and correctly connected to the appropriate pins on the ESP8266, BMP280, and 2004 LCD.
-
Verify I2C addresses: Use an I2C scanner sketch to confirm the I2C addresses of the BMP280 sensor and the 2004 LCD display. Update the addresses in the code if necessary.
-
Test components individually: Test each component separately to isolate any issues. For example, test the BMP280 sensor and ESP8266 without the 2004 LCD connected, and vice versa.
-
Check for library conflicts: Ensure that there are no conflicts between the installed libraries in the Arduino IDE.
Conclusion
In this tutorial, we learned how to connect an ESP8266 with a BMP280 sensor and a 2004 LCD display. We used the Arduino IDE for programming the ESP8266. This setup can be used as a mini weather station to monitor temperature and pressure. You can further enhance this project by connecting it to the internet and sending the data to a cloud platform for analysis and visualization.