
Connecting ESP8266 and ESP32 Using ESP-NOW
ESP-NOW is a powerful communication protocol developed by Espressif Systems, creators of the popular ESP8266 and ESP32 microcontrollers. With low power consumption, high-speed data transfer, and a simple setup process, ESP-NOW has become the go-to choice for many IoT projects. In this blog post, we will explore how to establish a connection between an ESP8266 and an ESP32 using ESP-NOW.
Introduction to ESP-NOW
ESP-NOW is a connectionless communication protocol that enables devices to send data directly to one another without the need for a Wi-Fi network. It is based on the 802.11 vendor-specific action frames and is specifically designed for low-power and low-latency data transfers. ESP-NOW can be used for applications such as home automation, sensor networks, and other IoT projects where quick and efficient communication is crucial.
Requirements
To follow this tutorial, you will need the following components:
- ESP32 development board
- ESP8266 Development Board (such as NodeMCU) (Affiliate) – https://s.click.aliexpress.com/e/_DD3JQhj
- Breadboard and jumper wires (Affiliate) – https://s.click.aliexpress.com/e/_Dl5kuk1
- Arduino IDE with ESP32 and ESP8266 boards installed
Setting Up the Hardware
Since ESP-NOW uses the built-in Wi-Fi module of the ESP boards, there is no need for any additional wiring between the devices. Simply power up the ESP32 and ESP8266 using their respective USB cables.
Code for ESP32 (Controller)
Upload the following code to the ESP32 using the Arduino IDE:
#include <WiFi.h>
#include <esp_now.h>


// Replace with the MAC address of your ESP8266
uint8_t receiverAddress[] = {0x24, 0x0A, 0xC4, 0x01, 0x11, 0x22};


// Callback when data is sent
void onDataSent(const uint8_t *mac_addr, esp_now_send_status_t status) {
Serial.print("Last Packet Send Status: ");
if (status == ESP_NOW_SEND_SUCCESS) {
Serial.println("Delivery success");
} else {
Serial.println("Delivery fail");
}
}


void setup() {
Serial.begin(115200);


// Set device as a Wi-Fi Station
WiFi.mode(WIFI_STA);
WiFi.disconnect();


// Initialize ESP-NOW
if (esp_now_init() != ESP_OK) {
Serial.println("Error initializing ESP-NOW");
return;
}


// Register callback for sending data
esp_now_register_send_cb(onDataSent);


// Add receiver's MAC address
esp_now_peer_info_t peerInfo;
memcpy(peerInfo.peer_addr, receiverAddress, 6);
peerInfo.channel = 0;
peerInfo.encrypt = false;


if (esp_now_add_peer(&peerInfo) != ESP_OK) {
Serial.println("Failed to add peer");
return;
}
}


void loop() {
// Send data to the receiver
uint8_t data[] = "Hello, ESP-NOW!";
esp_err_t result = esp_now_send(receiverAddress, data, sizeof(data));


if (result == ESP_OK) {
Serial.println("Sent with success");
} else {
Serial.println("Error sending data");
}


delay(2000);
}
Make sure to replace the receiverAddress with the MAC address of your ESP8266.
My ESP32 is a pain, maybe yours isn´t…I have to press the BOOT and next the EN button to put it in programming mode, only then it´s possible to download.

After the download, to put the ESP32 in running mode, I have to press the EN button

Code for ESP8266 (Receiver)
Upload the following code to the ESP8266 using the Arduino IDE:
#include <ESP8266WiFi.h>
#include <espnow.h>


// Callback when data is received
void onDataReceived(uint8_t *senderMac, uint8_t *incomingData, uint8_t len) {
Serial.print("Received: ");
for (int i = 0; i < len; i++) {
Serial.print((char)incomingData[i]);
}
Serial.println();
}


void setup() {
Serial.begin(115200);


// Set device as a Wi-Fi Station
WiFi.mode(WIFI_STA);
WiFi.disconnect();


// Print MAC address of the receiver
Serial.print("Receiver MAC: ");
for (int i = 0; i < 6; i++) {
Serial.print(WiFi.macAddress()[i], HEX);
if (i < 5) {
Serial.print(":");
}
}
Serial.println();


// Initialize ESP-NOW
if (esp_now_init() != 0) {
Serial.println("Error initializing ESP-NOW");
return;
}


// Register callback for receiving data
esp_now_set_self_role(ESP_NOW_ROLE_SLAVE);
esp_now_register_recv_cb(onDataReceived);
}


void loop() {
// Nothing to do here
}
After uploading the code, open the Serial Monitor for the ESP8266 and note down its MAC address. You will need to update the receiverAddress in the ESP32 code accordingly.
Testing the Connection
Once both the ESP32 and ESP8266 are programmed, open their respective Serial Monitors in the Arduino IDE. You should see the ESP32 sending the message “Hello, ESP-NOW!” to the ESP8266 every two seconds. The ESP8266 should display the received message in its Serial Monitor.
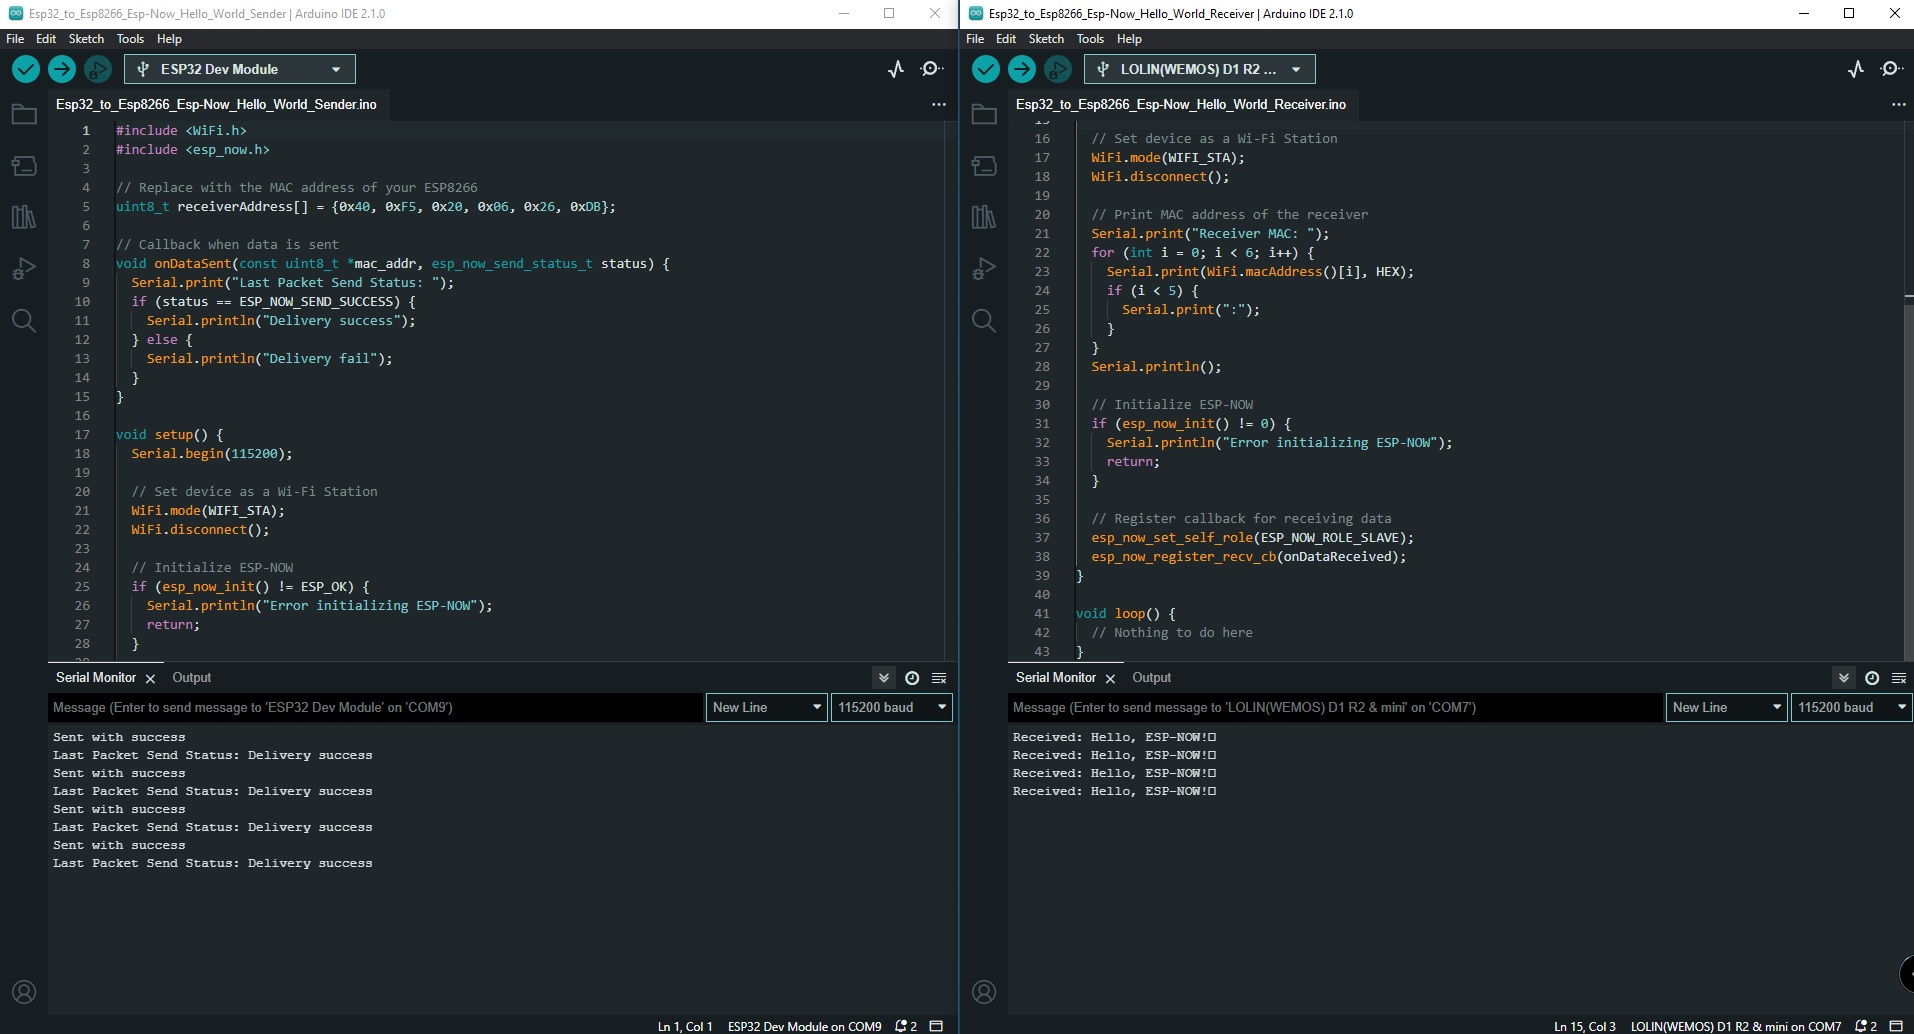
If you see the messages being transmitted and received successfully, congrats! You have successfully connected an ESP8266 and an ESP32 using ESP-NOW.
Troubleshooting and Tips
- This might be stupid to say, but make sure that you clearly identify the boards as sender and receiver and double-check the port multiple times. This confusion happened to me.
- If you encounter issues with communication, double-check the MAC addresses used in the sender’s code.
- Ensure that both ESP8266 modules are within the range of each other. ESP-NOW typically has a range of about 200 meters in open spaces.
- If you’re using ESP-NOW for battery-powered devices, consider using the
WiFi.setSleepMode()function to save power. - For more advanced use cases, consider using ESP-NOW with encryption enabled for secure communication.
Conclusion
In this tutorial, we demonstrated how to establish a connection between an ESP8266 and an ESP32 using the ESP-NOW protocol. This connectionless communication method is ideal for IoT projects that require low power consumption and rapid data transfer. With its ease of use and versatility, ESP-NOW has the potential to become an essential tool in your IoT arsenal. We hope this guide has helped you better understand how to harness the power of ESP-NOW in your projects.