
Connecting DS1307 RTC Module to Wemos D1 Mini
The DS1307 RTC (Real Time Clock) with an AT24C32 module is an inexpensive, accurate to a certain degree, I2C real-time clock with a small integrated battery for maintaining timekeeping when main power is lost. uRTCLib by Naguissa is an Arduino compatible library that provides access to the time and date functions of the RTC, making it a good choice for projects where you need to track time, without worrying about resets or power losses.
In this tutorial, we will guide you through the process of connecting a DS1307 AT24C32 RTC module to a Wemos D1 Mini and using the uRTCLib by Naguissa to display the date and time on the serial monitor.
Materials Required:
- ESP8266 Development Board (such as NodeMCU) (Affiliate) – https://s.click.aliexpress.com/e/_DD3JQhj
- DS1307 AT24C32 RTC Module (Affiliate) – https://s.click.aliexpress.com/e/_DlYHuVj
- Breadboard and jumper wires (Affiliate) – https://s.click.aliexpress.com/e/_Dl5kuk1
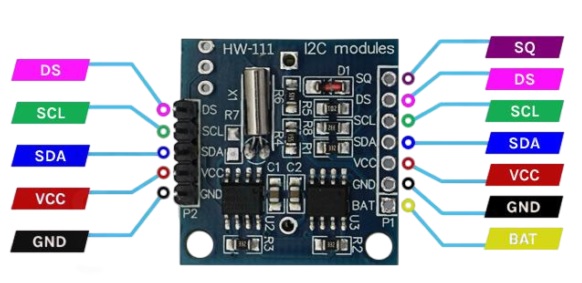
Step 1: Wiring Everything Up
Before you start programming the Wemos D1 Mini, you need to wire it correctly to the RTC module. Here’s how to connect them:
- VCC of the DS1307 to 5V
- GND of DS1307 to Global GND
- SDA (Serial Data Line) of DS1307 to D2 of Wemos D1 Mini
- SCL (Serial Clock Line) of DS1307 to D1 of Wemos D1 Mini
Ensure that your connections are secure and double-check them to avoid any errors during the program execution.
Direct Power Connection to Wemos D1 Mini

External Regulated Power Supply (Preferred Way)

Step 2: Installing uRTCLib Library
To communicate with the DS1307 RTC module, you need to install the uRTCLib library developed by Naguissa. You can install this library directly through the Arduino IDE:
- Open Arduino IDE.
- Navigate to Sketch > Include Library > Manage Libraries.
- In the Library Manager, search for “uRTCLib”.
- Find the uRTCLib by Naguissa and install it.

Step 3: Programming the Wemos D1 Mini
The following is a sample Arduino sketch to use with your Wemos D1 Mini:
#include "uRTCLib.h"

// uRTCLib rtc;
uRTCLib rtc(0x68);

void setup() {
  Serial.begin(115200);
  delay(3000);  // wait for console opening

  URTCLIB_WIRE.begin();

  rtc.set(0, 56, 12, 2, 13, 2, 24);
  // rtc.set(second, minute, hour, dayOfWeek, dayOfMonth, month, year)
}

void loop() {
  rtc.refresh();

  Serial.print("Current Date & Time: ");
  Serial.print(rtc.day());
  Serial.print('/');
  Serial.print(rtc.month());
  Serial.print('/');
  Serial.print(rtc.year());
  Serial.print(' ');
  Serial.print('|');
  Serial.print(' ');
  Serial.print(rtc.hour());
  Serial.print(':');
  Serial.print(rtc.minute());
  Serial.print(':');
  Serial.println(rtc.second());

  delay(1000);
}
After uploading this code to your Wemos D1 Mini, the time should be displayed in the Serial Monitor.

Step 4: Setting the Time
You’ll need to replace the placeholders with the current UTC time. Remember to comment out or remove this line after setting the time to prevent resetting it every time the Wemos restarts.
rtc.set(0, 56, 12, 2, 13, 2, 24);
// rtc.set(second, minute, hour, dayOfWeek, dayOfMonth, month, year)
That´s it, nothing more to do.
Conclusion
You have now successfully connected a DS1307 AT24C32 RTC Module to a Wemos D1 Mini and displayed the date and time on the Serial Monitor using the uRTCLib by Naguissa. This setup can be used in data logging, time-stamping, and many other time-related projects.
Remember to encase your RTC module to prevent any damage or inaccuracies caused by exposure to heat and light, as that can affect the RTC’s battery life and timekeeping.