Connecting an ESP8266 to a 2004 LCD: A Comprehensive Guide
The ESP8266 is a low-cost Wi-Fi microchip that has gained popularity among hobbyists and developers for its versatility and ease of use. The 2004 LCD is a 20×4 character display module that is commonly used in various electronics projects. In this blog post, we will explore how to connect an ESP8266 to a 2004 LCD and provide an in-depth example to help you get started with your own projects.
Prerequisites
Before we begin, make sure you have the following components:
- ESP8266 development board (e.g., NodeMCU or Wemos D1 Mini) (Affiliate) – https://s.click.aliexpress.com/e/_DD3JQhj
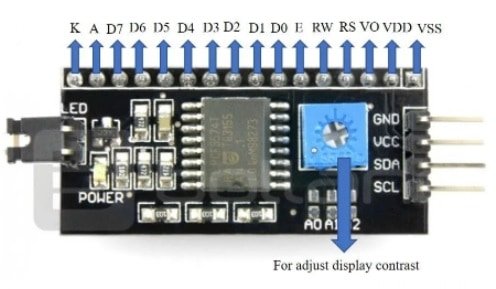
- I2C interface
- 2004 LCD module (with I2C interface) – (Affiliate) – https://s.click.aliexpress.com/e/_DE4GaZb

- Breadboard and jumper wires (Affiliate) – https://s.click.aliexpress.com/e/_Dl5kuk1
- Micro USB cable
- Arduino IDE installed on your computer
Step 1: Wiring the Components
First, let’s connect the ESP8266 to the 2004 LCD module using the I2C interface. The I2C interface simplifies the wiring process and reduces the number of pins required. Here’s how to wire the components:
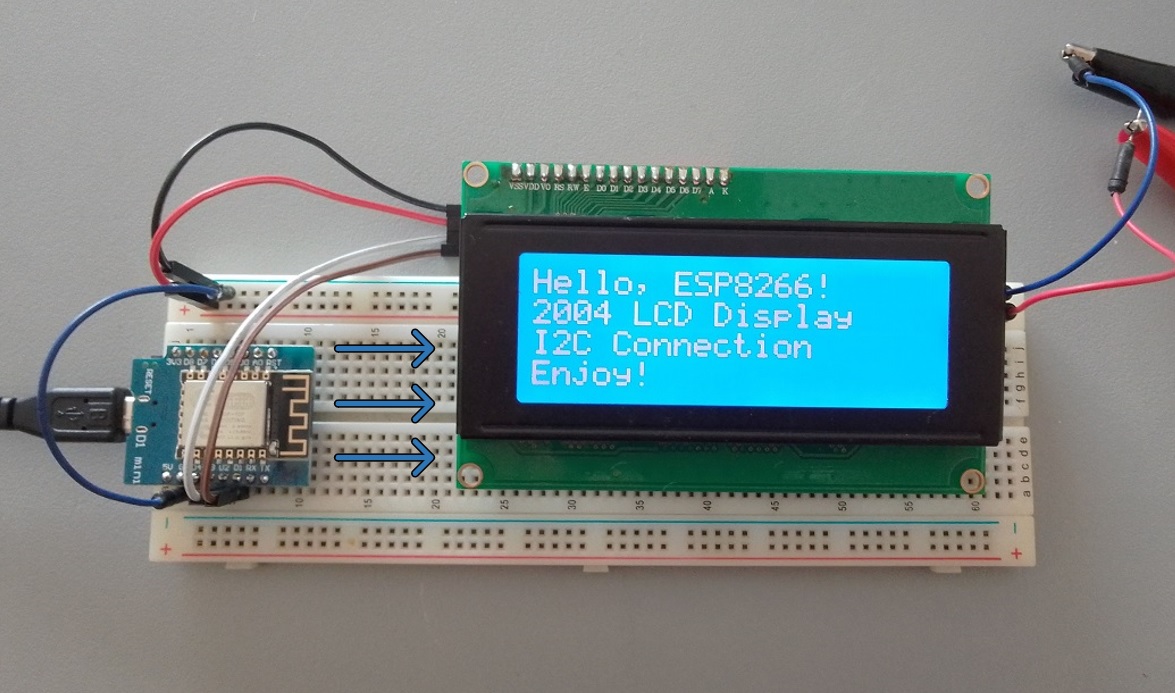
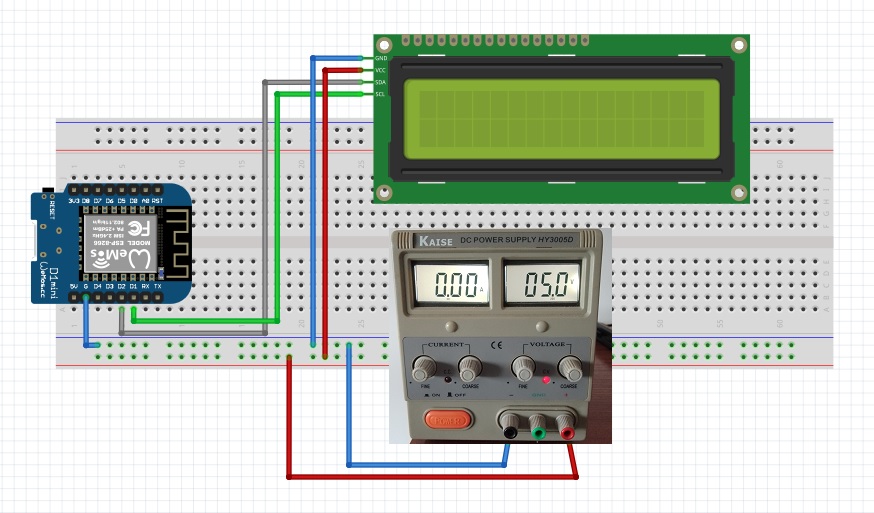
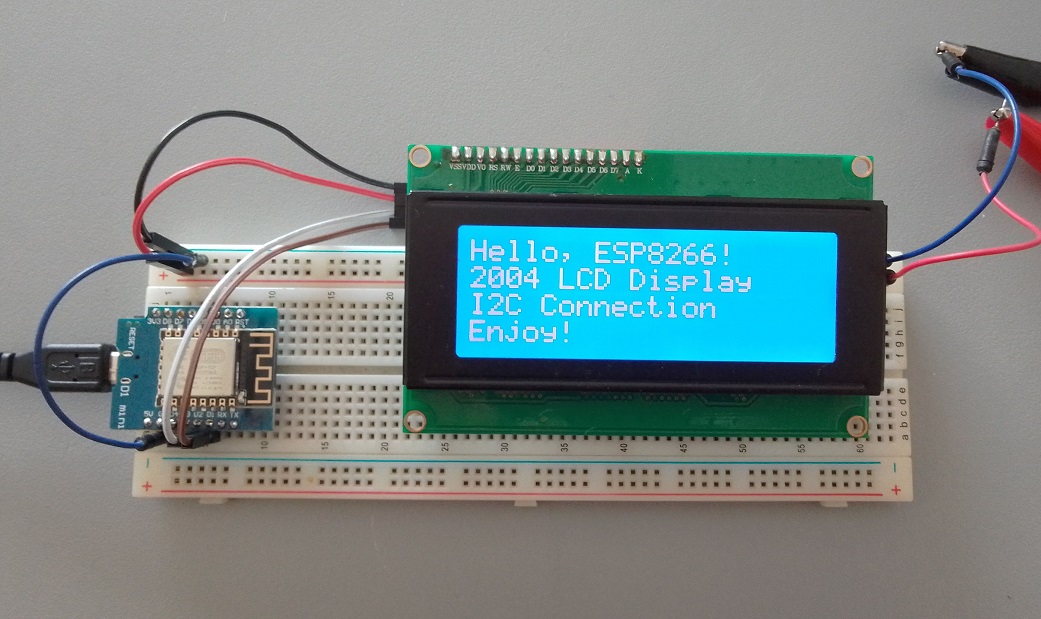
1. Connect the VCC pin of the 2004 LCD to the 5V pin of the Wemos D1 Mini. (You can do it but i don´t recommend this – it is better to power the LCD from an external 5V regulated power source and it was what I did)
2. Connect the GND pin of the 2004 LCD to the GND pin of the Wemos D1 Mini. (If using an external power source, All GND have to be interconnected)
3. Connect the SDA pin of the 2004 LCD to the D2 pin of the Wemos D1 Mini.
4. Connect the SCL pin of the 2004 LCD to the D1 pin of the Wemos D1 Mini.
Version 1 – All the connections to the Wemos D1 Mini

Version 2 – Power connections from an external power source ( All GND have to be interconnected)
Step 2: Installing the Required Libraries
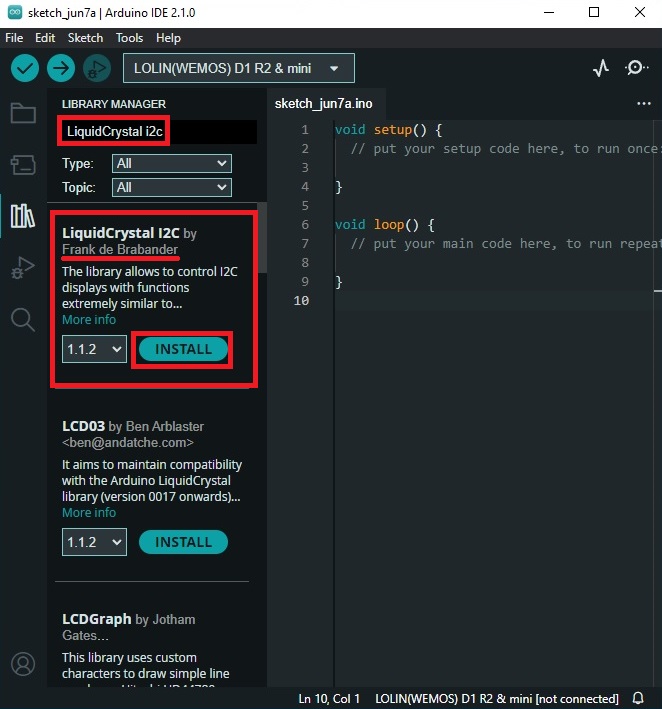
To communicate with the 2004 LCD, we need to install two libraries in the Arduino IDE:
1. LiquidCrystal_I2C: This library allows us to control the 2004 LCD using the I2C interface.
2. Wire: This library is used for I2C communication between the ESP8266 and the 2004 LCD.
To install the libraries, open the Arduino IDE and go to Sketch > Include Library > Manage Libraries. Search for “LiquidCrystal_I2C” and install the latest version.

In my case there was a Warning in the end of the installation of the Library. Ignore it, the LCD worked fine (For now 🙂 ).

Step 3: Writing the Code
Now that we have the necessary libraries installed, let’s write the code to display a message on the 2004 LCD:
#include <Wire.h>
#include <LiquidCrystal_I2C.h>

// Initialize the LiquidCrystal_I2C library with the I2C address (0x27) and the dimensions of the LCD (20x4)
LiquidCrystal_I2C lcd(0x27, 20, 4);

void setup() {
  // Initialize the LCD
  lcd.init();
  // Turn on the backlight
  lcd.backlight();

  // Display a message on the LCD
  lcd.setCursor(0, 0);
  lcd.print("Hello, ESP8266!");
  lcd.setCursor(0, 1);
  lcd.print("2004 LCD Display");
  lcd.setCursor(0, 2);
  lcd.print("I2C Connection");
  lcd.setCursor(0, 3);
  lcd.print("Enjoy!");
}

void loop() {
  // Nothing to do here
}
Step 4: Uploading the Code
Connect your ESP8266 to your computer using a micro USB cable. In the Arduino IDE, go to Tools > Board and select your ESP8266 board. Then, go to Tools > Port and select the appropriate COM port.
Click the Upload button to upload the code to your ESP8266. Once the upload is complete, you should see the message displayed on the 2004 LCD. If NOT and all the connections were well made, try push RESET button on the board, the info should show in the screen (it happened to me).
Problems?
Incorrect wiring: Ensure that the connections between the ESP8266 and the LCD are correct. Double-check the wiring diagram and make sure that the VCC, GND, SDA, and SCL pins are connected properly.
Incompatible library: Make sure you are using the correct library for your LCD display. For example, if you’re using an I2C LCD, you should use the LiquidCrystal_I2C library.
Incorrect I2C address: The I2C address of the LCD may be different from the one specified in your code. Use an I2C scanner sketch to find the correct address and update your code accordingly.
#include <Wire.h>

void setup() {
  Serial.begin(115200);
  Serial.println("\nI2C Scanner");
  Wire.begin(4, 5); // SDA on GPIO4 (D2) and SCL on GPIO5 (D1)
}

void loop() {
  byte error, address;
  int nDevices;

  Serial.println("Scanning...");

  nDevices = 0;
  for (address = 1; address < 127; address++ ) {
    Wire.beginTransmission(address);
    error = Wire.endTransmission();

    if (error == 0) {
      Serial.print("I2C device found at address 0x");
      if (address < 16) {
        Serial.print("0");
      }
      Serial.print(address, HEX);
      Serial.println(" !");

      nDevices++;
    } else if (error == 4) {
      Serial.print("Unknown error at address 0x");
      if (address < 16) {
        Serial.print("0");
      }
      Serial.println(address, HEX);
    }
  }
  if (nDevices == 0) {
    Serial.println("No I2C devices found\n");
  } else {
    Serial.println("done\n");
  }
  delay(5000);
}
Upload this sketch to your ESP8266, and open the Serial Monitor (set the baud rate to 115200). The sketch will scan the I2C bus every 5 seconds and display the addresses of any connected devices.
If the connections to the LCD are all fine, when we run the sketch without the LCD being powered (external power source) It will display the following message:

When we power up the LCD (external power source),The message will be this:
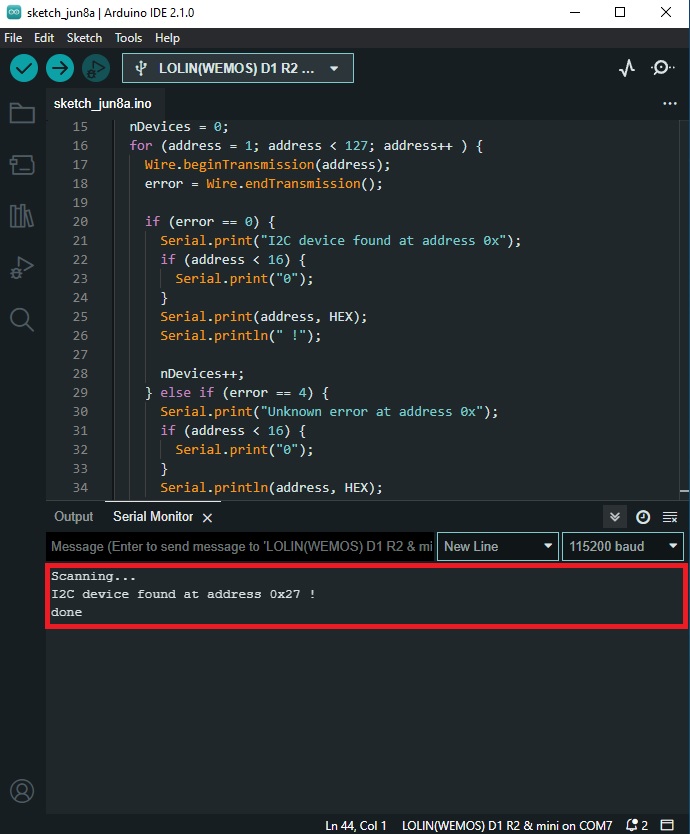
This has to be the same as the address in the code: LiquidCrystal_I2C lcd(0x27, 20, 4);
Insufficient power supply: The ESP8266 and the LCD may require more power than your power source can provide. Ensure that you are using a stable power supply with sufficient current.
Loose connections: Check for loose connections between the ESP8266, the LCD, and the power source. Reseat any loose connections and ensure that all components are securely connected.
Faulty components: It’s possible that either the ESP8266 or the LCD display is faulty. Test each component individually to rule out any hardware issues.
Incorrect initialization: Ensure that the LCD is properly initialized in your code. Double-check the initialization parameters, such as the number of columns and rows, and the I2C address.
Software bugs: There may be bugs in your code that prevent the LCD from displaying text correctly. Review your code for any syntax errors or logical issues.
Contrast issues: The contrast of the LCD may be too low, making the text difficult to see. Adjust the contrast using the potentiometer on the back of the LCD or through software if supported.
Incompatible hardware: Some LCD displays may not be compatible with the ESP8266. Check the datasheets and documentation for both components to ensure compatibility.
Conclusion
In this blog post, we have demonstrated how to connect an ESP8266 to a 2004 LCD using the I2C interface. We have also provided an in-depth example to help you get started with your own projects. With this knowledge, you can now create more advanced projects that incorporate both the ESP8266 and the 2004 LCD. Happy coding!