
Connecting a TM1637 to an ESP8266
In this blog post, we will explore how to connect a TM1637 display module to an ESP8266 microcontroller and provide a detailed explanation of the code involved. The TM1637 is a popular 4-digit 7-segment LED display module, while the ESP8266 is a Wi-Fi capable microcontroller widely used in IoT projects. By connecting these two components, we can create a simple yet effective display system for our projects. So, let’s get started!
Hardware Required:
- ESP8266 Development Board (such as NodeMCU) (Affiliate) – https://s.click.aliexpress.com/e/_DD3JQhj
- TM1637 display module (Affiliate) – https://s.click.aliexpress.com/e/_DCwvPgx
- Breadboard and jumper wires (Affiliate) – https://s.click.aliexpress.com/e/_Dl5kuk1
Goodies:
- Datasheet: Link to download
Step 1: Wiring the Components
To begin, let’s connect the TM1637 display module to the ESP8266 microcontroller using jumper wires. Refer to the following wiring diagram:
- Connect VCC to a +4.7V External Regulated Power Supply (or to 5V on the Esp8266 <- not recommended because this Wemos D1 Mini is only 3.3v logic tolerant, we can see this on the tm1637 Datasheet that the logic value is 0.7*VCC witch give us approx. +3.3v of Logic Level Voltage and this is OK if we don´t want to burn the Little Guy)
- Connect the GND pin of the TM1637 to the GND pin of the ESP8266/Global GND.
- Connect the CLK pin of the D5 Pin of the Wemos D1 Mini.
- Connect the DIO pin of the D6 Pin of the Wemos D1 Mini.

Step 2: Adding Required Libraries
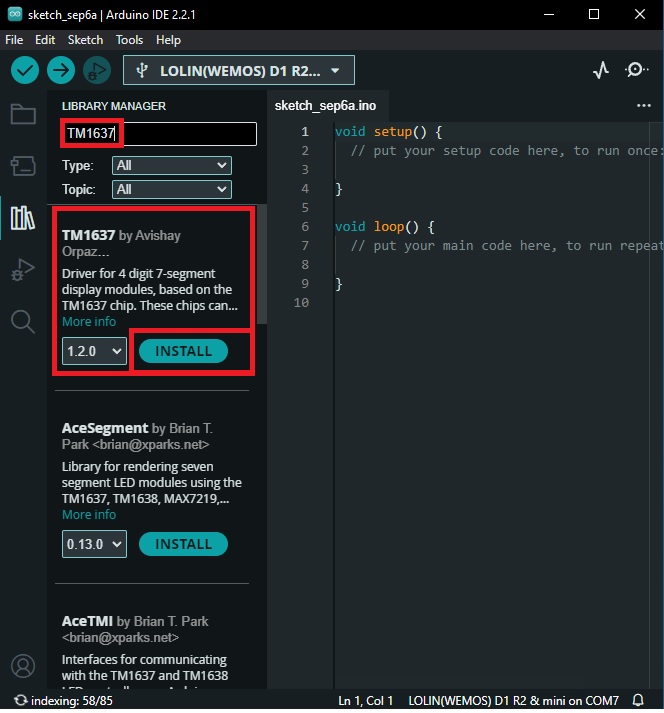
To control the TM1637 display module, we need to install the “TM1637Display” library.
- Open the Arduino IDE, go to “Sketch” → “Include Library” → “Manage Libraries” and search for “TM1637”.
- Install the library authored by “Avishay” latest version.
Step 3: Writing the Code
Let’s now proceed to write the code to control the TM1637 display. Here’s an example code that displays “1234” on the TM1637 in a continuous loop:
#include <TM1637Display.h>

const int CLK_PIN = D5;  // CLK pin connected to D5
const int DIO_PIN = D6;  // DIO pin connected to D6

TM1637Display display(CLK_PIN, DIO_PIN);  // Initialize the TM1637 display

void setup() {
  display.setBrightness(7); // Set display brightness (0-7)
}
void loop() {
  display.showNumberDec(1234);  // Display the number 1234
  delay(2000);                  // Delay for 2 seconds
  display.clear();              // Clear the display
  delay(1000);                  // Delay for 1 second
}
Make sure to replace the CLK_PIN and DIO_PIN with the corresponding pin numbers you connected in Step 1.
Step 4: Uploading the Code
Connect the ESP8266 to your computer using a USB cable. In the Arduino IDE, select the correct board (In my case Wemos D1 Mini) and the appropriate port from the “Tools” menu. Click on the “Upload” button to compile and upload the code to the ESP8266.
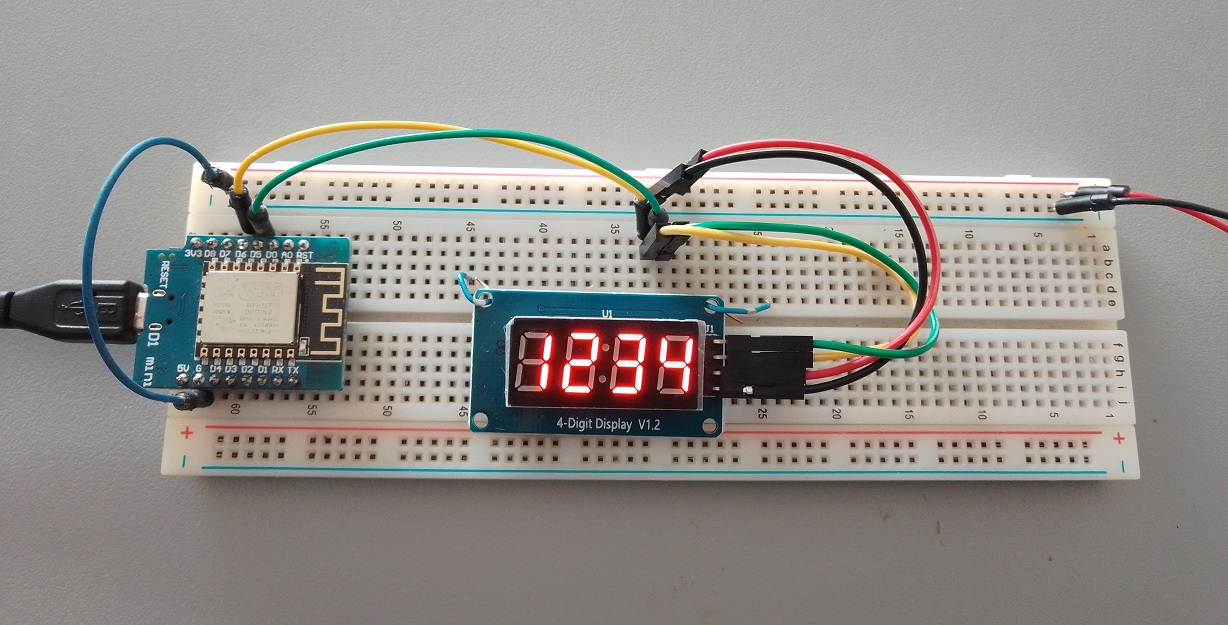
Step 5: Testing the Setup
After the code is successfully uploaded, the TM1637 display should start showing “1234” repeatedly with a 2-second delay between each display. If you observe this behavior, congratulations! You’ve successfully connected and controlled the TM1637 display using the ESP8266.
Code explained:
Let’s go through the code step by step and explain each part in detail:
In this line, we include the library TM1637Display.h, which is necessary to control the TM1637 display module. This library provides functions to control the display and handle the 7-segment digits.
#include <TM1637Display.h>
Here, we define two constants CLK_PIN and DIO_PIN to store the corresponding pins on the ESP8266 microcontroller to which the CLK and DIO pins of the TM1637 display are connected.
const int CLK_PIN = D5; // CLK pin connected to D5 (GPIO14)
const int DIO_PIN = D6; // DIO pin connected to D6 (GPIO12)
TM1637Display class named display and specify the CLK and DIO pins as parameters. This initializes the display module and allows us to control it using the functions provided by the library.
TM1637Display display(CLK_PIN, DIO_PIN); // Initialize the TM1637 display
setup() function is called once when the microcontroller is powered on or reset. In this function, we use the setBrightness() function to set the brightness level of the display. The brightness value ranges from 0 (lowest) to 7 (highest).
void setup() {
  display.setBrightness(7);
}  // Set display brightness (0-7)
The loop() function is the main function that runs repeatedly after the setup()function is called. In this case, we use the showNumberDec() function to display the number 1234 on the TM1637 display. Then, we introduce a delay of 2 seconds using the delay() function. After that, we clear the display using the clear() function and have a 1-second delay. This creates a loop where number is displayed for 2 seconds, followed by a 1-second pause, and then the process repeats.
void loop() {
  display.showNumberDec(1234);  // Display the number 1234
  delay(2000);                  // Delay for 2 seconds
  display.clear();              // Clear the display
  delay(1000);                  // Delay for 1 second
}
That’s the breakdown of the code. It initializes the TM1637 display, sets the brightness, and continuously displays the number 1234 with delays in between. You can modify the code and use different functions from the TM1637Display library to customize the display according to your requirements.
A counter using the TM1637 display, which counts from 0 to 10 and loops back
#include <TM1637Display.h>

const int CLK_PIN = D5;    // CLK pin connected to D5
const int DIO_PIN = D6;    // DIO pin connected to D6

TM1637Display display(CLK_PIN, DIO_PIN);  // Initialize the TM1637 display

void setup() {
  display.setBrightness(7);  // Set display brightness (0-7)
}

void loop() {
  for (int i = 1; i <= 10; i++) {  // Counter loop from 0 to 10
    display.showNumberDec(i);  // Display the current counter value
    delay(1000);  // Delay for 1 second
  }
  display.clear();  // Clear the display
}
In this code:
-
We include the
TM1637Display.hlibrary and define the CLK_PIN and DIO_PIN constants, specifying the respective pins on the microcontroller to which the TM1637 display is connected. -
Next, we create an instance of the
TM1637Displayclass nameddisplayusing the CLK_PIN andIO_PIN. -
In the
setup()function, we set the brightness to the maximum value of 7. -
In the
loop()function, we use a for loop to iterate from 0 to 10. Inside the loop, we display the current counter value using theshowNumberDec()function and delay for 1 second using thedelay()function. -
After the loop completes, we clear the display using the
clear()function.
This code will continuously loop through the numbers 0 to 10, displaying each number for 1 second on the TM1637 display before moving to the next number. Once it reaches 10, it will loop back to 0 and continue the process.

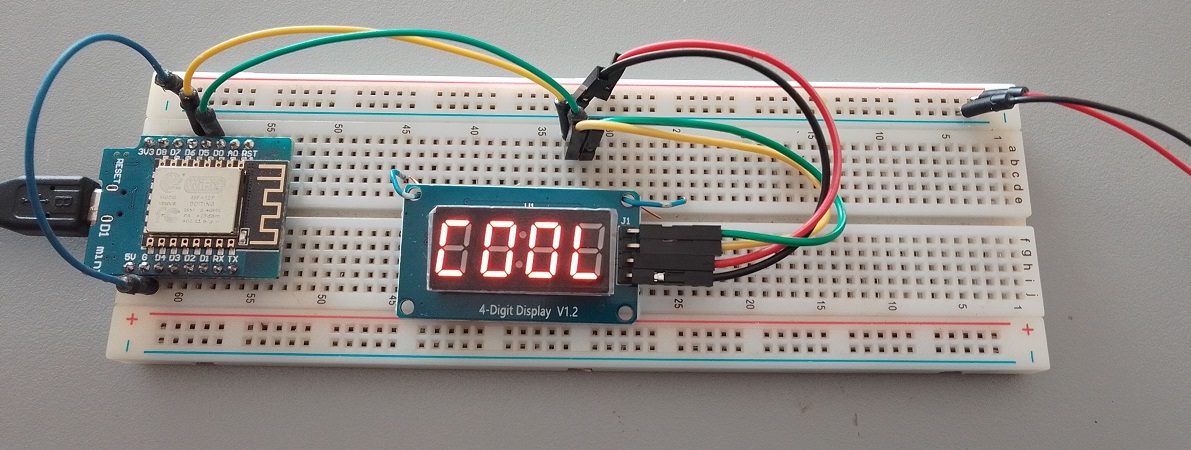
Custom Segments:
To Write Custom segments we just have to follow the next schematic:

And change in the code:
const uint8_t COOL[] = {
    SEG_A | SEG_F | SEG_E | SEG_D ,                  // C
    SEG_A | SEG_B | SEG_C | SEG_D | SEG_E | SEG_F,   // O
    SEG_A | SEG_B | SEG_C | SEG_D | SEG_E | SEG_F,   // O
    SEG_F | SEG_E | SEG_D                            // L
    };
Cool Code:
#include <TM1637Display.h>

const int CLK_PIN = D5;  // CLK pin connected to D5
const int DIO_PIN = D6;  // DIO pin connected to D6

TM1637Display display(CLK_PIN, DIO_PIN);  // Initialize the TM1637 display

const uint8_t COOL[] = {
    SEG_A | SEG_F | SEG_E | SEG_D ,                  // C
    SEG_A | SEG_B | SEG_C | SEG_D | SEG_E | SEG_F,   // O
    SEG_A | SEG_B | SEG_C | SEG_D | SEG_E | SEG_F,   // O
    SEG_F | SEG_E | SEG_D                            // L
    };

void setup() {
  display.setBrightness(7);
}  // Set display brightness (0-7)
void loop() {
  display.setSegments(COOL);   // Display "COOL"
  delay(2000);                  // Delay for 2 seconds
  display.clear();              // Clear the display
  delay(1000);                  // Delay for 1 second
}
Conclusion:
In this blog post, we covered the process of connecting a TM1637 display module to an ESP8266 microcontroller. We outlined the necessary steps, provided a wiring diagram, explained the code, and walked you through uploading and testing the setup. By following these instructions, you can integrate a TM1637 display with your ESP8266-based projects effectively. Have fun experimenting and building exciting applications!