Connecting a DS18B20 Wemos D1 Mini
The DS18B20 is a widely used digital temperature sensor that provides accurate and reliable temperature readings. In this tutorial, we will guide you through the process of connecting a DS18B20 sensor to a Wemos D1 Mini and displaying temperature data on the Serial Monitor using the Arduino IDE.
Components Needed:
- ESP8266 Development Board (such as NodeMCU) (Affiliate) – https://s.click.aliexpress.com/e/_DD3JQhj
- DS18B20 Temperature Sensor Module (Affiliate) – https://s.click.aliexpress.com/e/_DCn5dHx
- Row male Pin header (Affiliate) – https://s.click.aliexpress.com/e/_DmzyvbP
- Breadboard and jumper wires (Affiliate) – https://s.click.aliexpress.com/e/_Dl5kuk1
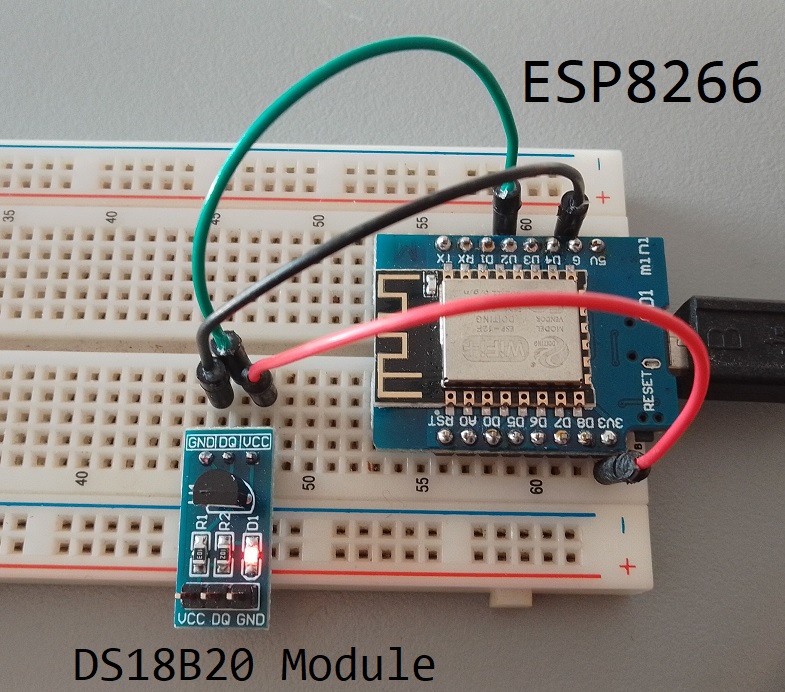
Wiring Diagram:
Before connecting the sensor module to the breadboard, it is optional to solder an Row male Pin header to help with the orientation. You can also use jumper wires to connect the module to the Esp8266.

Connect the components as follows:
- Connect the DS18B20 sensor to the Wemos D1 Mini as follows:
- DS18B20 VCC pin to 3.3V on Wemos D1 Mini
- DS18B20 GND pin to GND on Wemos D1 Mini
- DS18B20 Data pin to D2 on Wemos D1 Mini

Installing Necessary Libraries:
Before starting the coding process, ensure that you have the necessary libraries installed. Open the Arduino IDE, go to Sketch -> Include Library -> Manage Libraries and install the “OneWire” and “DallasTemperature” libraries.


Arduino Code:
#include <OneWire.h>
#include <DallasTemperature.h>

// Data wire is connected to pin D2 on Wemos D1 Mini
#define ONE_WIRE_BUS D2

// Setup a oneWire instance to communicate with any OneWire devices
OneWire oneWire(ONE_WIRE_BUS);

// Pass oneWire reference to DallasTemperature library
DallasTemperature sensors(&oneWire);

void setup() {
  Serial.begin(115200);
  sensors.begin(); // Initialize the temperature sensor library
}

void loop() {
  sensors.requestTemperatures(); // Send the command to get temperatures

  // Get temperature from the DS18B20 sensor
  float temperatureC = sensors.getTempCByIndex(0);

  // Check if temperature reading is valid
  if (temperatureC != DEVICE_DISCONNECTED_C) {
    // Print the temperature in Celsius to Serial Monitor
    Serial.print("Temperature: ");
    Serial.print(temperatureC);
    Serial.println(" °C");
  } else {
    Serial.println("Error reading temperature!");
  }

  delay(1000); // Wait for 1 second before the next reading
}
Understanding the Code:
- The
OneWireandDallasTemperaturelibraries are used for communication with the DS18B20 sensor. - The data wire from the DS18B20 sensor is connected to pin D2 on the Wemos D1 Mini.
- The
setupfunction initializes the serial communication and the temperature sensor library. - In the
loopfunction, we request the temperature from the sensor, check if the reading is valid, and then print the temperature to the Serial Monitor. - The delay of 1 second (
delay(1000)) is added to avoid overloading the sensor with frequent requests.
Uploading the Code:
- Connect your Wemos D1 Mini to your computer using a USB cable.
- Open the Arduino IDE and select the correct board and port under
Tools. - Copy and paste the provided code into the Arduino IDE.
- Click the “Upload” button to upload the code to your Wemos D1 Mini.
Viewing Temperature Data:
- Once the code is uploaded, open the Serial Monitor by clicking on
Tools -> Serial Monitorin the Arduino IDE. - You should see temperature readings displayed in Celsius every second.

That’s it! You have successfully connected a DS18B20 sensor to a Wemos D1 Mini and displayed temperature data on the Serial Monitor. This basic setup can be extended for more advanced projects involving IoT and temperature monitoring.